


demo243
-
Posts
1,501 -
Joined
-
Last visited
-
Days Won
2
Content Type
Profiles
Forums
Events
Store
Classifieds
Posts posted by demo243
-
-
Diving into to fuel system rabbit hole right now…
Planning on using -6 fuel rail to feed the carbs. From my reading these carbs like a pretty low consistent pressure ~2.5lbs. I worry about overflow from over pressure, so I want to run a return (unlike my mikunis on 510).
Pump and regulator now need to be decided- seems the only low pressure bypass style return regulator I can find down to 2 psi is Aeromotive. Then just need to decide on a fuel pump- Carter p4070- Aeromotive $$$ - or Holley Red (supposedly very loud)
-
 1
1
-
-
11 minutes ago, datsunfreak said:
Do they allow hydraulic handbrakes?
Doubtful….
I personally like the idea of having a mechanical back up anyway.
I should just get a new caliper or two - some fresh pads and rotors and be done with it… but at that point it’s pretty tempting to bump up to the T3 set up.
-
1
-
-
Mine showed up today- these housings are worlds better then the z car depot ones I bought!
-
1
-
-
Got a little more sorted on the carbs as well.
Picked up an adjustment lever from OER to use an idle adjust for the whole set up.

Still working out where I’m going to mount it- but here is where I’m thinking.


This is another option- but I don’t really like it pushing off the top cover… there is another way to mount it lower so it pushed off the carb body here, but it also interferes with the carb body so tbd… another issue is the front of the shaft may be too short , I wasn’t planning for this lever when I took my measurements so it may not work…
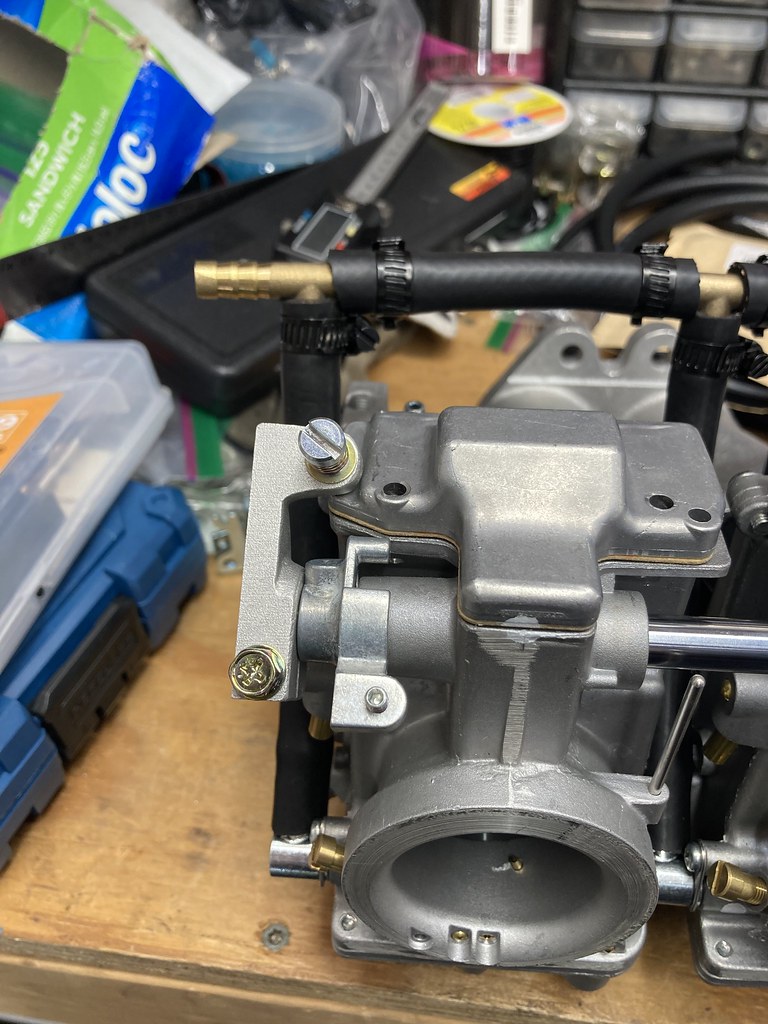
Throttle shaft is in works but under wraps for the moment!Also mocked up the fuel lines- wasn’t expecting much- but pretty disappointed. It was going to be temporary while I ensured this plan would “work” and then I was going to make a fuel rail for it. But now I think I might just do it right and fab up a custom fuel rail.

^^^ ignore the messy bench… it’s usually not this bad… but pressed for space and time right now so it’s gotten a little out of hand
Another sneak peak-
-
2
-
-
It was a nice warm day up here in the northeast today. Tried to take the Z for a spin… but it had other plans. Pushed it out to a nice puddle under the driver rear tire. I guess the driver rear caliper decided to give out and puke all the brake fluid out….

So now I need to make a decision… these rear brake need help because there is an interference between the parking brake and the body… question is what do I want to do long term… and how long are these remain 240sx/280zx calipers going to be around…. So do I just replace this caliper and run the the set up - should probably do new pads and rotors all around … or do I upgrade.
The fronts are non vented Toyota calipers - fine for what they are but I planned to eventually replace them. Likely a wilwood kit of some sort- but which , and I’ve heard their rear parking brake leaves a lot to be desired which could be very problematic for me since Massachusetts tests the parking brake- I think it’s rev to 1300 rpm and let out on the clutch and it’s supposed to hold.
So hmmm decisions decisions…
-
Always best to measure for your specific set up- but looking back at my Driveshaft Shop.com I ordered a 38-9/16” shaft for my 4 door. That is from the transmission seal to the flat flange of the diff as they asked for. My engine is slightly pushed back toward the firewall so you may need another 1” or so additional length, so as I mentioned worth measuring your set up once it’s in.
I had a l20b with 280z 5 speed in it before and the shifter was pushed further back with the KA so your current shaft is likely long enough to be trimmed down.
-
1
-
-
Other considerations- smaller diameter then stock is quicker acceleration but you’ll rev out sooner and have a slower top speed (could be an issue for highway cruising- especially if you are running a 4spd). Larger diameter comes with potential clearance issues and will effect acceleration making it feel more sluggish or slow off the line. These can be fixed with a re-gear but not a simple task.
I think your working with a truck here- in my opinion trucks looks better with some sidewall.
im also not a huge fan of the the stretched look - but too each their own.
Also who is mounting the tires. Many shops will not stretch a tire for liability issues. So you may be limited by that.
Availability and price play a roll too. Some tire sizes - especially 15s and smaller are only available in high performance tires which come at a cost and also perform poorly in rain or cold weather- so may not be the best for a daily driver
-
2
-
-
“Proper” recommended fitment per the tire manufacturer… or preferred visual fitment… or performance fitment.
lots of different answers to this question.
-
1
-
-
This thing looks awesome! Can’t wait to see more.
-
Just now, datsunfreak said:
Correct. Order 1, get two lights, two bulbs, and the harness.
Order placed !
Probably should have just gotten two to hold on to one 🤣
-
1
-
-
@datsunfreak this is a set of two of them? So I only need to order qty 1?
-
You guys might have convinced me Hahha they are so cheap I might have to buy them.
-
1
-
-
Hmmm these look interesting
gotta go look at the ones I picked up from Zcar depot- but I think these look nicer! For much cheaper
-
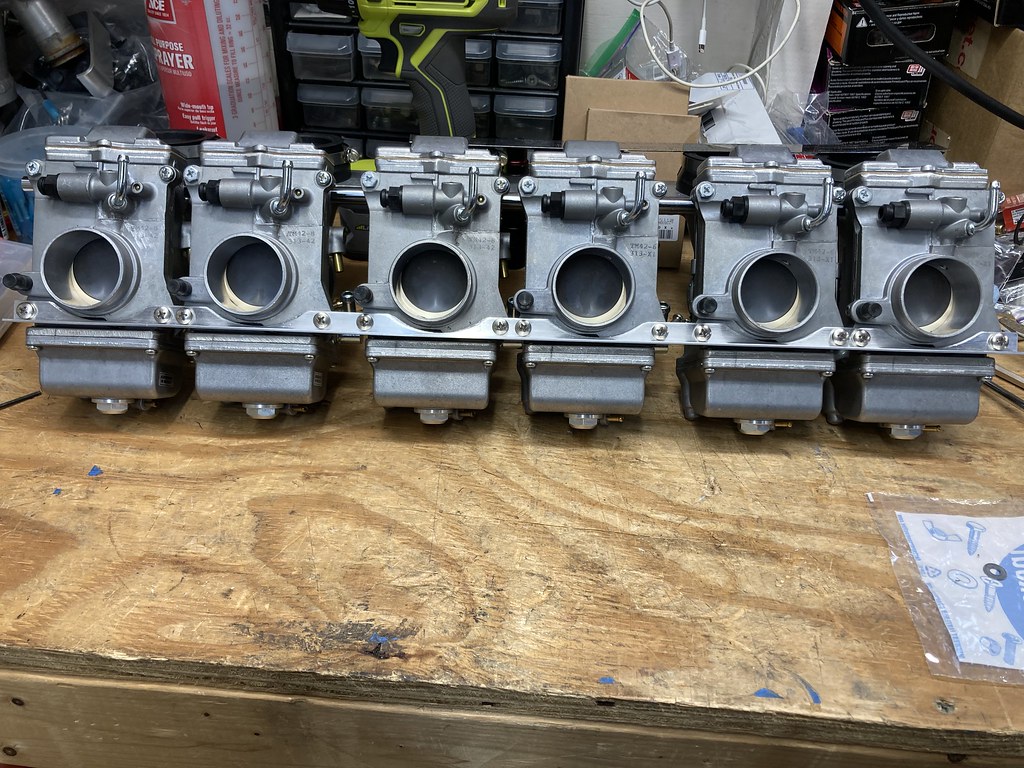
Set up the overflow drain system. I have read you can crimp these off... but that just forces an overflow out of the upper vent, so I will route these out to a small catch can in case of an overflow.

Trimmed and epoxied idle adjusters. Ultimately I probably won't use these... but they are needed to seal the carb and prevent a vacuum leak. Working on a idle arm to adjust the common shaft all at once.

Throttle lever mock up - Picked up a Lonely Driver arm and Protunerz cable kit. Made up this bracket quickly. Originally it was more "complex" but decided it wasn't needed.


-
3
-
-
Old grainy photo… but early WRX seats in my 510. Fit quite nicely. Mounting may require some custom work… mine are bolted to the front seat mount and then to the floor with some makeshift spacers from the previous owner- so don’t expect them to be bolt in…

I’ve got Sparco R100s in the Z and been quite happy with them for the price- a little firm but pretty comfortable. Since they fit in the Z they would definitely fit in a 510. A more universal mount so with a planted or other brands adapter for the 510 should be good to go. Photo of them in the Z - tried one of the wrx seats in the Z and it was too big.

-
1 hour ago, chukar said:
Nice looking 240Z. Which I had more space.
https://seattle.craigslist.org/see/cto/d/seattle-1972-datsun-240z/7713272479.html
No way that car is $6500….
Thats got scam written all over it to me!
But I’d check on it either way, it’ll be gone today if it’s real
-
1
-
-
Does the 521 have a load sensing valve like the 620?
I had a hell of time getting that bled on my 620, but once it was done it make a big difference.
That would drastically effect the rears if you have an issue there
-
1
-
-
Still chipping away the carbs, but nothing exciting to update there at the moment.
I did pick up another set of wheels for the Z - These will be shoulder season (spring/fall) and winter storage wheels. The deal from Kansei was pretty good so I grabbed em. Tires on the other hand are tougher to come by. But I ended up with some 225/50r15 Kumhos which are a 400 tread wear all season. Should be perfect for my use. Will likely run these for any road trips too since they will definitely handle any unexpected rain better then my Falken 660s.

-
2
-
-
On 1/19/2024 at 10:26 AM, kylem7793 said:
I saw a post where flatcat19 talked about doing ITBs on a vk45. I am trying to find out how to get in touch with him. Anyone know?
Looking for this post?
It’s been over a year since flatcat was on here- could try DM and maybe he’ll get the email.
-
We'll hit a snag on the HSR project
Going to need a machinists....
Tried to drill the throttle shaft for the carb's today but the rods I got are just too hard, drill bits aren't even making a mark... even if I could get one drilled there is no way I would get all 18 done.... I’d be blowing through bits and there is no way it would be accurate enough.
Probably not a bad thing… since hopefully they will be more accurate then I could be.
-
1
-
-
Had a little bit of time this morning - so I decided to give it one more to. Simplified it a little bit using a bigger whole saw and based the position off the one good one from the last round.
Happy enough with the results. It really does stiffen the rack up so I’ll plan on running it as long as it doesn’t mess with the sync of the carbs. Looked closer at the back plate of the carb and it is definitely not flat, so that was the issue before. Spaced it out with 2 thin washers which seemed to be enough.
Next up - throttle shaft. A little worried about being precise enough but going to give it a shot! First priority is the spacing of the threaded slide mounts- then I need to figure out the angle offset of the accelerator and throttle stop/return spring (both of these have a little adjustment so I don’t think I need to be as precise- but will obviously try!)
Anyway here is the new brace-

-
2
-
-
R&D continues! Was tied up all weekend, but snuck out this evening for a little bit this evening.
Here was my inspiration for this round - Bonneville Performance's dual Mikuni kit... ultimately he is one of the big reasons I decided to give this thing a try overall! I figured the partial circle would be much easier fabricate then the notches I tried before.

First I drilled the carb mount holes; then screwed it to a spare 2x6; used a spare piece of metal as a guide to avoid scratching up the angle piece and went to town with the hole saw.
Came out looking really good!

Unfortunately it wasn't all meant to be.... I mixed up some measurements somewhere.... and the clearance holes were slightly off on all but one (I swear I triple checked measurements...) - The good news is my carb mount holes were good.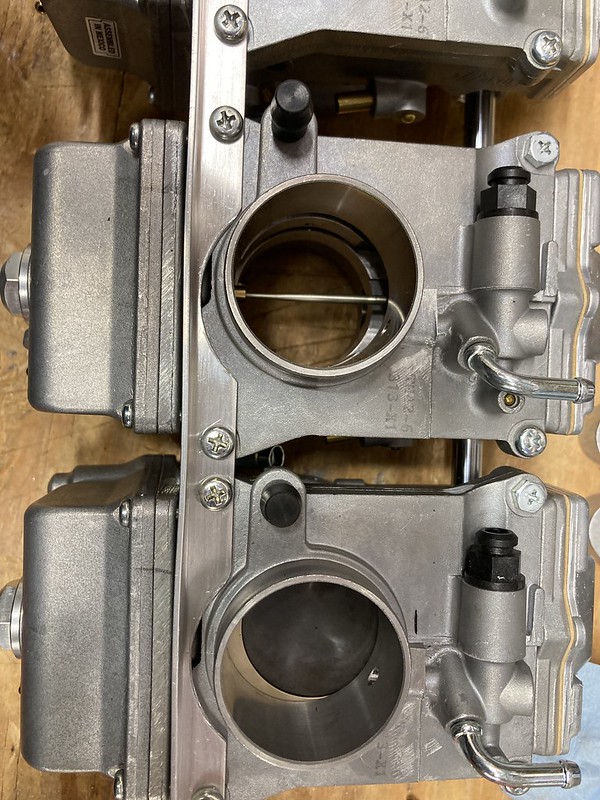
The bad news was as soon as I tightened it down it got all wonky....

It seems that I missed an important little detail --- a spacer! I had noticed the small machined section for the screw head- but missed it later on, and missed it in this photo from Bonneville. Here you can see there is a spacer to off set the bracket.

Overall not a total failure - functioned as a proof of concept; both in the process and that it did stiffen the whole structure up. The next question is whether it is really needed or not - my hope was it would help align the carb bodies and therefor the throttle shaft mounts... but is it worth chasing right now? It really did help it stay together as a "rack" of carbs, but the throttle shaft is not connected and there are no return springs... once those are in place they will hold together better. Not sure if it will make it easier or harder to mount the carbs to the rubber adapters as right now it is quite hard.I think I am going to work on the throttle shaft next- for that I only really need the carb spacing - the rest will be based off a straight line on the shaft...
But I am not abandoning the bracket. Next one should be quicker to make.-
3
-
-
Back to the drawing board on the brace for the carbs... My fabrication tools and capabilities are just not up to my original plan. I could have made it work, but it just wasn't going to be as clean as I want it to be... Only out $5 and about an hour, so no big deal.


Ive got another rough idea that involves a 2x6 and a hole saw.... but that is likely to come out rougher then I would like as well... hole saws just don't make clean cuts easily. But I might try it, only a couple bucks for that small piece of aluminum. Also looking into send cut send or a similar site, but need to find a free cad software for that.
The other option would be to run individual pieces between each carb - I guess better then not having a brace at all, but definitely not as stiff as I was hoping for. I mostly want this brace to have another plane of alignment beyond the throttle shaft; this should help ensure that the carbs stay synced together; because if all the slide mounts are in a precise row, if one carb is slightly off angle in the rubber mount then it would likely have a slightly different sync, the downfall of having them all on one shaft.-
2
-
-
Not much to update - waiting on some metric drill bits and taps and a few other things.
Got lucky with the rod I ordered- it seems like it will be almost the perfect length without needing to cut it down.

Had an “epiphany” about the idle adjusters. They are quite thin- only 5mm so I would need a very small set screw… then I had the idea if I’m going to join the brass hat to the screw body itself why not just expoxy it! Much easier then all the extra drilling and tapping. So I think I’m going to go that route- there isn’t much force needed for them- and realistically I only need one- so I’ll scuff up the mating surfaces and put a little epoxy in there.
Also tried to add a brace under the float bowls but that didn’t work… going to use a small piece of angle aluminum along the back of the carb above the float bowl. Kinda like this but I don’t plan to cut as much out to clear the throats

Ordered up a Lonely Driver throttle arm- finding a nice one for a 10mm shaft is hard… just need to figure out the cable bracket but gonna try and sort something out like this-

thinking about the fuel system right now- simplest is to just get some 5/16 brass “T”s and do it that way - but the nice way would be to make a proper extruded fuel rail… tbd.-
1
-
'73 240z - Project Build
in Z-Car
Posted
I’ve been running the Carter pump in my 510 since I swapped to Mikuni carbs on that. Never had an issue with it and with the Holley regulator it seems to be fine… but agree on the quality of the Carter pump… feels cheap, mount is flimsy and the studs strip easy. It’s loud but once the car is running I don’t hear it anymore.
From what I can tell everyone in Japan running this style carb is running a rail and then return line. The Z still has the lines in place so I plan to utilize it.
From reading it sounds like a regulator post carb helps to maintain pressure especially during heavy fuel usage (possibly my problem currently with the SUs…) I was originally going to utilize the stock rail along the valve cover but eh not into it.
What I am thinking now is filter -> pump-> stock hard line to front of the car -> clear filter -> across the front to fuel rail -> loop return back along fuel rail and across the front -> regulator -> stock return hard line.
It’s more then I want to spend - but probably worth spending - so either Aeromotive 13202 regulator (2-20 psi) or Fuel lab 525 (1-3 psi). Leaning towards the Fuel Lab since it’s a better pressure range, also has a port for a gauge right on it.
Planning on a Ross Machine -6 rail- should allow me to directly cut threads for a m14 fitting on the ends- although would -6 fittings be able to? Having a tough time sorting this out… Then was planing on m12 to 5/16 barbs for the carbs.
With the regulator on the return I shouldn’t need any more restrictions on the line - but I did see Watcom makes a cool in-line one that uses Mikuni main jets to allow for easy adjustments.
@Stoffregen Motorsports @Crashtd420
@datsunfreak
appreciate any feed back on all this- all these different fittings, lines sizes and everything are all new to me. Everything on the 510 is 1/4” barb and npt.