


demo243
-
Posts
1,501 -
Joined
-
Last visited
-
Days Won
2
Content Type
Profiles
Forums
Events
Store
Classifieds
Posts posted by demo243
-
-
3 minutes ago, datzenmike said:
Ain't this the truth!!! The odd time a quick temporary fix works so well why mess with it.
But really- it’s driver car, no need to be perfect. Maybe someday I’ll make a nice metal cover to bolt on over it… but doubtful.
-
As it sits right now in its running and driving position. Included the seat and wheel to give you an idea on the driving position. I think I mentioned it before but I did have my KA iron mounts offset to push the engine back about an inch closer to the firewall for pan clearance since I went with a custom rear sump pan.

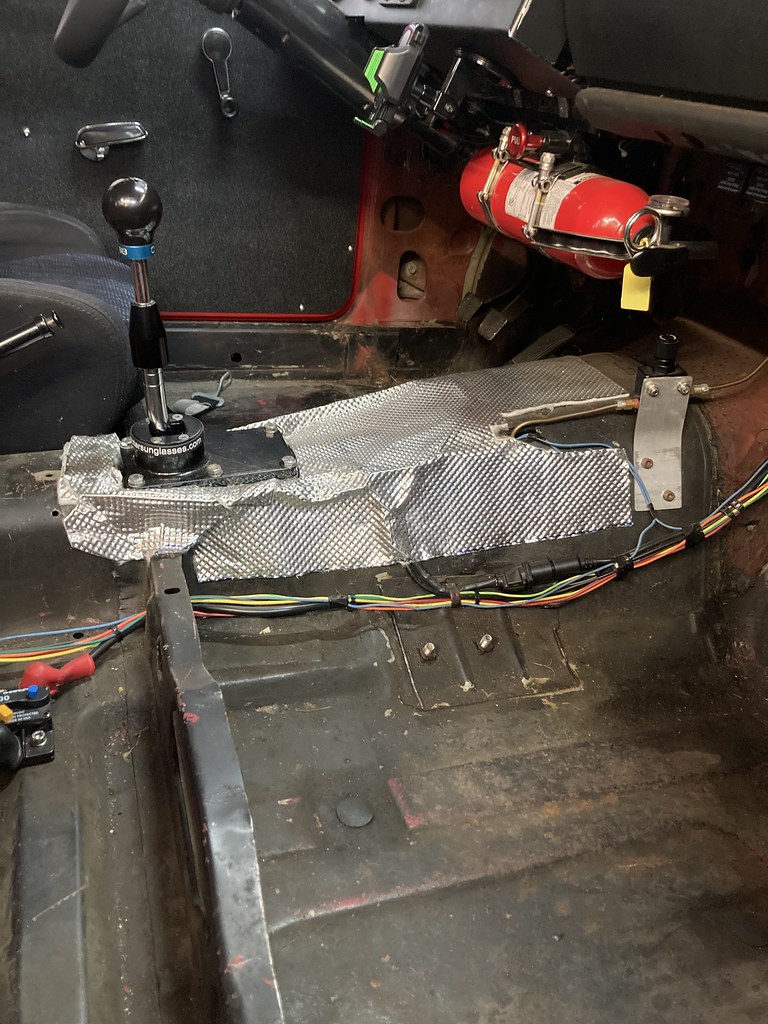
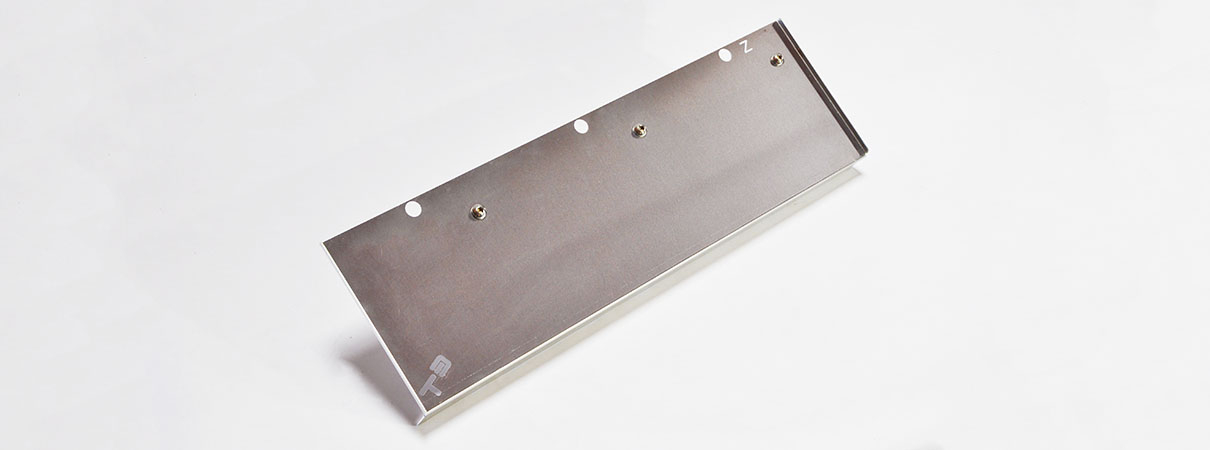
This is what I used to cover the hole in the tunnel.
https://www.designengineering.com/floor-tunnel-shield-ii-21-x-24/
It originally was all one piece, but then as you mentioned I had to work on the shifter so I cut it open. I need to add another piece on top to seal it up again.
A note on the short shifters- my trans came with a B&M one that I really didn’t like. Throws were really short but it was very notchy and did not like to go into reverse. When I swapped my 620 I used one of the cheap ebay ones and liked it much better, so I ended up swapping one into this car too.
-
 1
1
-
-
10 hours ago, datzenmike said:

Now that I look at it... why is this transmission sitting so high????
that was not its final resting height. That was when I was still playing around with the T3 trans mount and angles etc… actually still need to go back in and re check the the trans, driveline, and diff angles.@mhinkens I can grab a photo when I go out to the garage later. I did not weld it back up. Just used some DSI tunnel shield to make a cover- was supposed to be temporary… but it’s still there
-
Ok @mhinkens
here yah go-
l20b with 280z trans and stock shift hole

Trans tunnel cut for the KA and s13 5 spd- you may not need to cut down for that port but I don’t remember… this is with my McKinney mounts and possibly set back an extra inch…
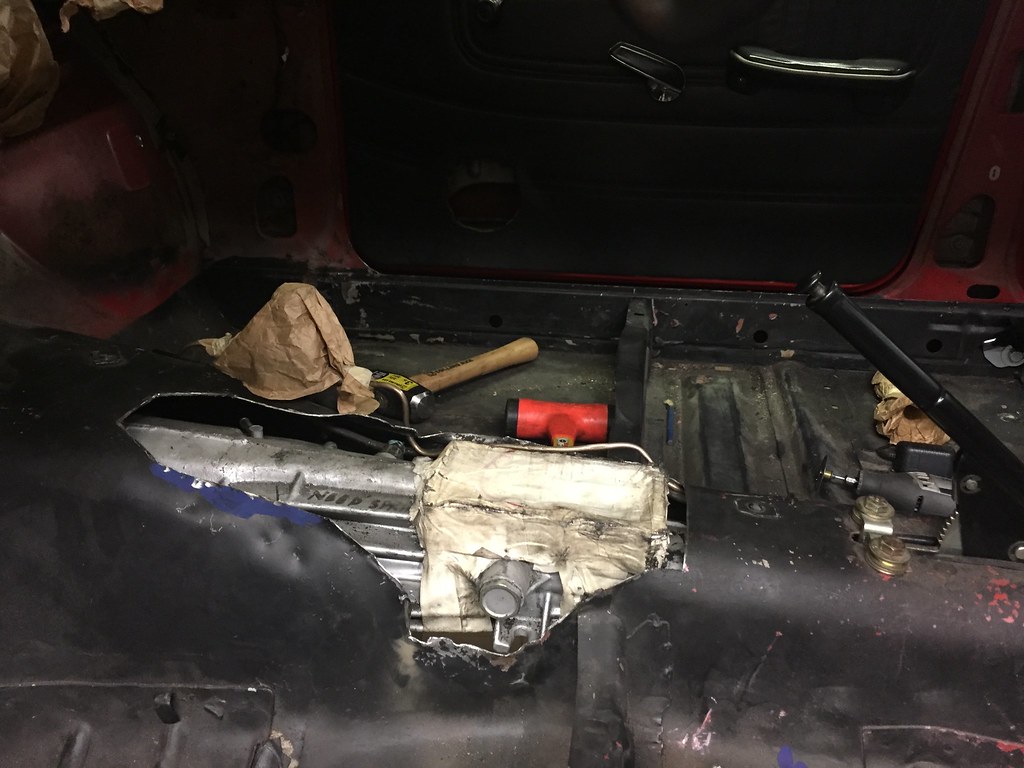
you can use the seat brackets as a reference for how much further back it sitshere is another photo with the shifter to show the shift position on the trans
-
17 hours ago, mhinkens said:
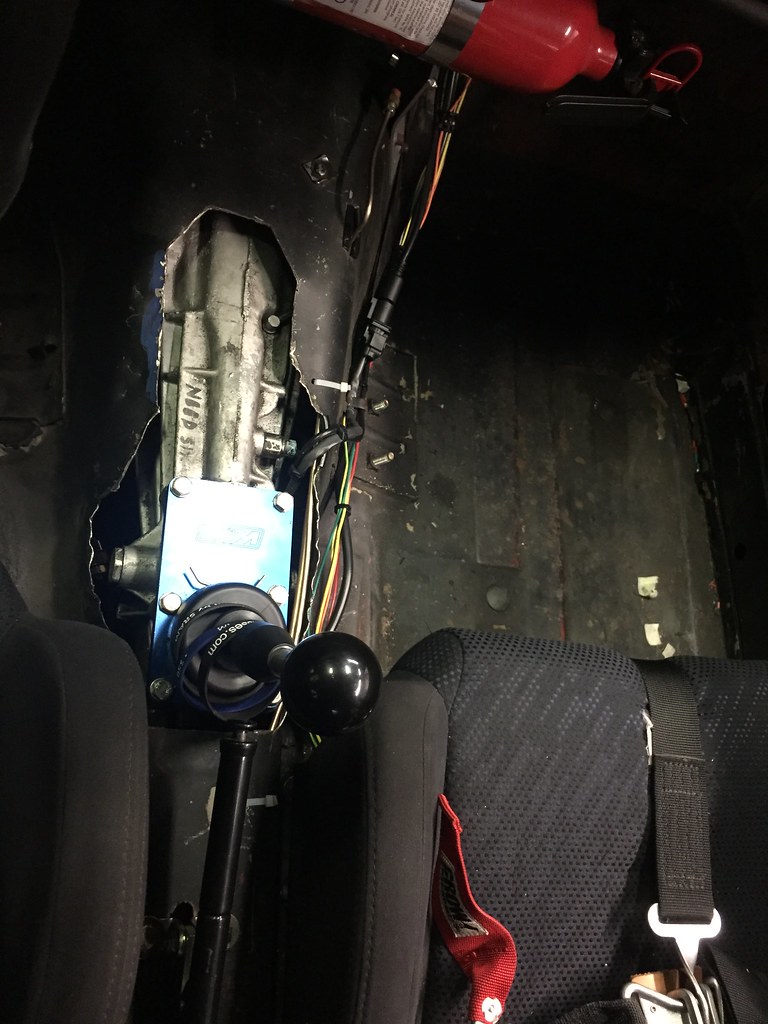
Still haven’t got access to my car—snowstorm coming tomorrow in Wisconsin—but was re-reading this and thinking about the hole for my shifter. With a l20b and zx 5-speed I assume the shifter hole in my car was already pushed back, but is the KA 5-speed shifter (from an s13) going to be even further back?!
Mine did move back further from my L20b with 280z trans (don’t think it was a zx)
If I remember I had to open up the trans tunnel anyway just to fit the trans. The shift ears are a big issue and needs a little “massaging”. I’ll try and look back for some photos.
Mine is far enough back that with my roll bar / wrx seat set up I really need a short shifter to limit the rear travel of the shifter to avoid elbow interference with the seat. That said my seat is further forward then I would normally position it but I am limited by the thicker seat and roll bar
-
5 hours ago, Crashtd420 said:
Well I have to park the datsun till I replace the front tires....
I have been sneaking it out on some of these nicer days only to realize how shitty my front tire is....

Obviously an alignment issue...
I have since redone it in my garage but the damage was already done....
Debating on getting it properly aligned this time.... I know where my error was and it was my own fault but I have no gauge to say I'm correct how it is now...
The way I do it I feel might be introducing some added variables...
I'll obviously have to recheck with the new tires, so that's why I'm thinking I might pay this time... figure when I get home I can compare what they did to my garage method and see how close I am... that will establish a good base line for future garage alignments ... guess I just gave myself the reason why I should....
Also trying something new getting tires....
Since money is tight I was looking on ebay and found a good pair of tires for $110... tires all seemed to be discounted a good 25%.... and I saw they offer tire installation and at discount. Getting 2 tires mounted and balanced, valve stem and disposal for $50... around town it is 40 to 50 per tire.... if this goes well I'll probably get 2 more coming for the rear next month...
I hate buying tires….
We have a mobile place here that was convenient, but not cheap… and wouldn’t “stretch” a 205 to a 8” wheel… not really even a stretch…
Went to Hogan for my last set but they scratched my new wheels- not terribly or even really noticeable but annoying. They do atleast off lifetime balance on them which is convenient for the all terrains on my Tacoma.
Did tire rack to the performance shop for the last set I had mounted for the 510 but install was really expensive!
going to need another set for the 510 probably next year… but the z should be good for a good 5+ years now based on my mileage
-
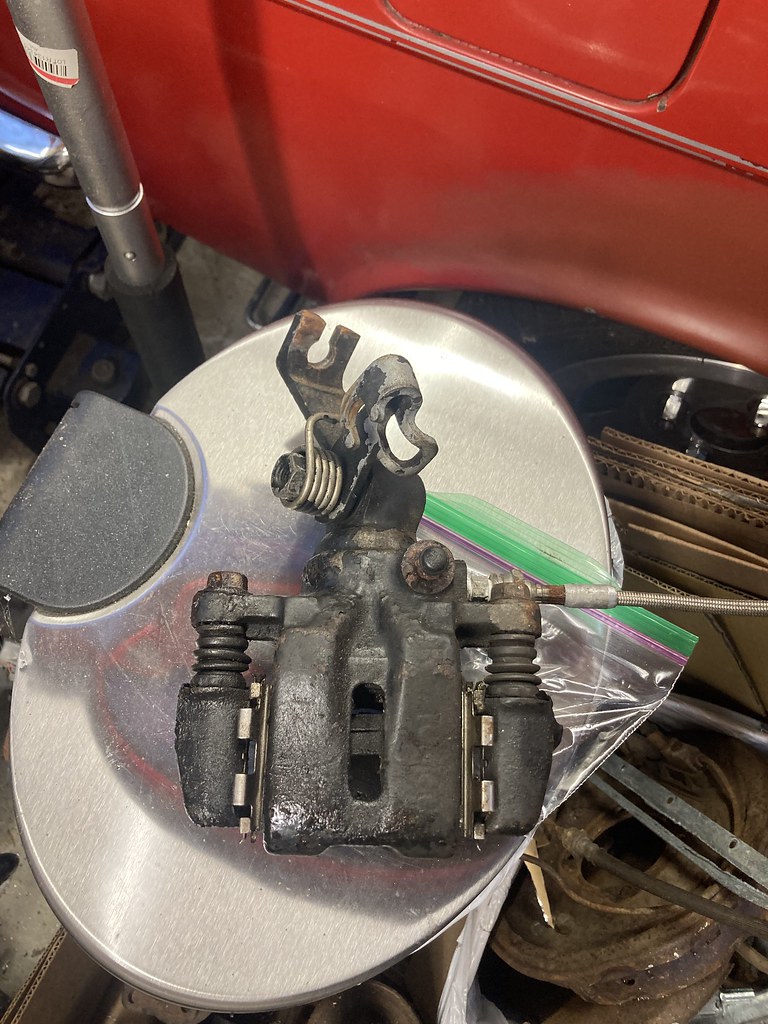
Finally had some nice weather and was able to push the z out for some work. Was hoping to get more done... but as with most things on this car something always comes up and takes longer.
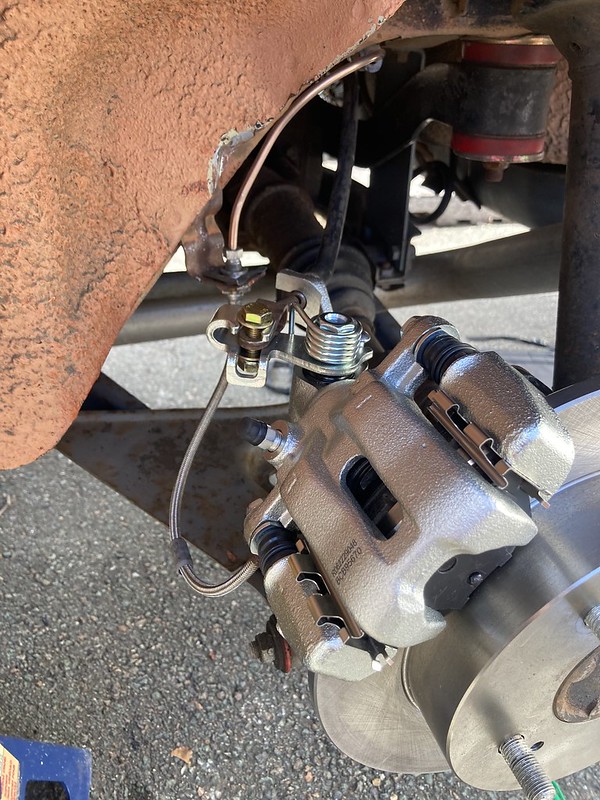
What I did get done is get the rear brakes updated - new calipers, rotors and pads. I did swap the calipers back to be on their "correct" sides; this puts the bleeders down low, but should only need to bleed them once so Ill pull them up for that and then bolt them back down, I do the same thing on the 510. This should hopefully give me a little more body clearance with the body. I snapped the hardline getting it bent back to shape so had to replace those while I was in there- they needed it anyway so for the better. The reman calipers seem to be of decent quality but I haven't bleed them yet. Two issues though- one is the notch in the piston didn't align with the pin on the pad, don't have the tools to twist them back - its installed and I will see when I bleed it if it settles in. Second issue is the e-brake arm; its just ever so slightly shorter then the ones that were on there, so the ebrake is essentially useless now. I need to add a collar to the cable housing to gain a few mm (~10) but will need to try and adjust the cable and tighten it up. Oh yea and had to cobble together a bolt set up for the connector instead of the pin in their before - better or worse idk...
Before-

After-
On the carb front - I got them all jetted with my "initial" jet specs. Picked up the P clips I needed for the final piece of the fuel rail. Then I dropped the in line restrictor... and it disappeared in my garage... literally gone... - so I ordered another one of those. Got the heat shield cut and bent- wanted to add a couple more bends but without a proper brake it won't happen and they aren't needed; just need some washers to so I can set the rivets. There will be a DSI Form a Shield section underneath it to help with the heat.
-
1 hour ago, mhinkens said:
Reawakening this thread...
It seems the Mckinney mounts don't exist anymore, but I have read that you can actually just use OEM 510 mounts.
So it goes:
- KA24de Engine
- Upper Bracket from KA mount
- 510 motor mount (dropped to the lower holes)
- Crossmember tower mount (on a stock flipped crossmember)
Is that right?!
Yes- but didn’t work for me… for some reason the engine just wouldn’t line up for me when using the upper/lower holes.I have Mckinneys from back in the day, but quality was poor.
another option is to use a 1/2” spacer between the upper mount and the engine block. Supposed to allow you to run stock 510 isolators in the stock location (not dropped down). I have the spacers but haven’t made the swap yet- here’s a link.
https://www.the510realm.com/viewtopic.php?t=29668&start=45
-
Yea that would work.
Tried crash’s idea and seemed to work pretty well.
Spent far to much time trying to figure out a mount for the rail and ultimately came up with a couple simple brackets down to the manifold. Just need to order some proper p-clips to secure the return fuel hose and the rail should be set! Hope it holds pressure! I did end up getting some of those oring washers. Ordered from Belmetric and they showed up the next day! I guess they have a location here in MA.
Still need to order the metal for the heat shied too.
Waiting on the first round of jets to show up to. Going off the suggestions of the Triumph guy I spoke with. Will start there and see where they are and then order more for tuning.
All my replacement brake stuff showed up this weekend too so just need some warm weather and quality driveway time.
-
3
-
-
1 hour ago, Crashtd420 said:
What about a long rod....
Cut a slot in the end then insert some sand paper and roll it around the end ...
Basically making a small cylinder....
Yes! I’ll try that tomorrow. I still have the 10mm rod I used for mock up, should give me just enough room to add some sand paper. I just want to make sure there are no errant aluminum pieces that end up in the carbs.
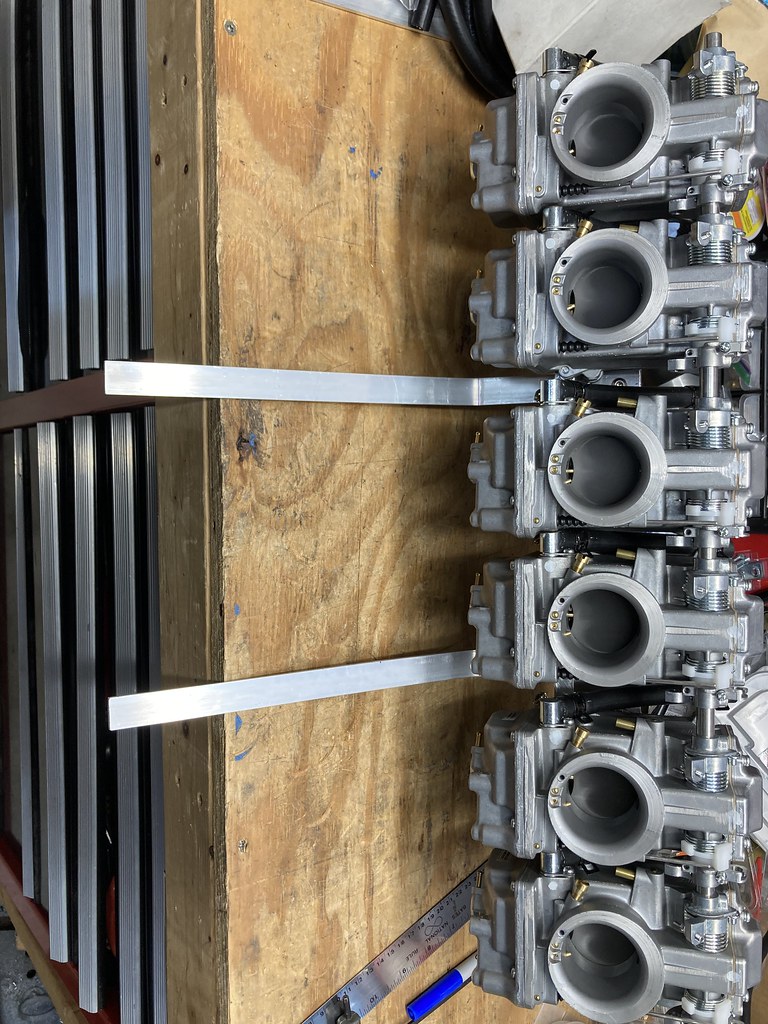
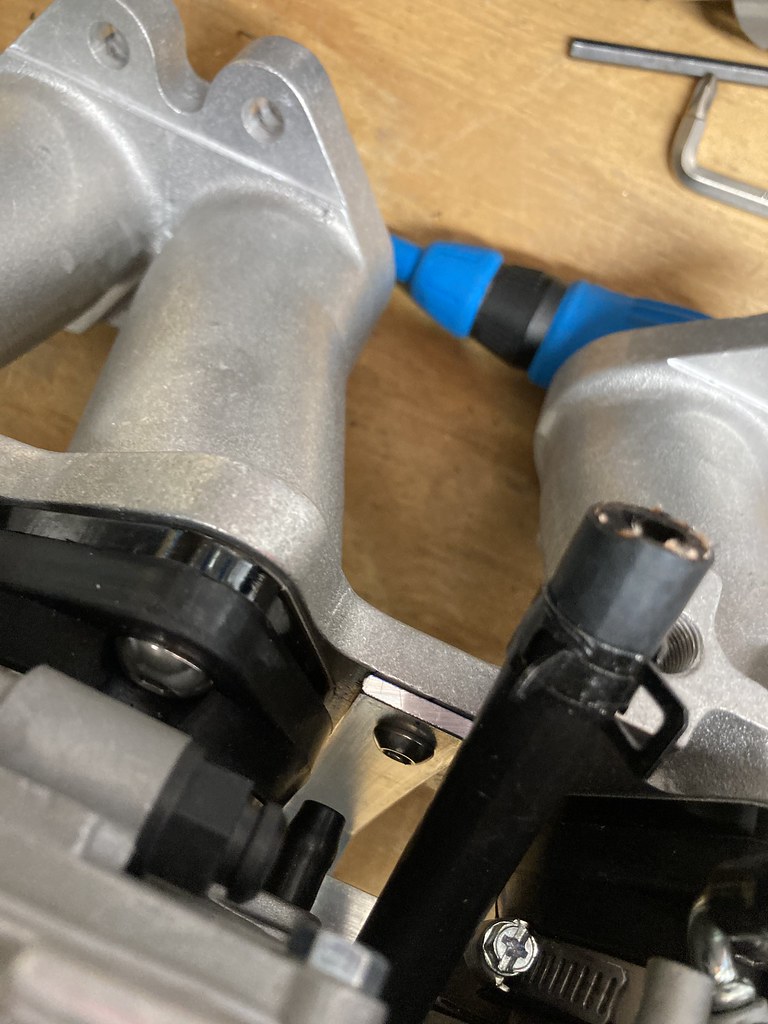
Trying to figure out how I’m going to mount or support the rail now.
Also need to figure out what the thread is on the linkage mounting points on this TWM manifold. Was thinking about using them as part of the mount- but can’t figure out what thread they are. Tried every bolt and tap and thread chaser I have an none of them fit!
-
2
-
-
Anyone got any suggestions for a 1/2” bore hone- needs to be atleast 12” long so I can reach the middle of the rail, want to clean up the center after drilling it. Maybe a gun barrel hone?
Everyone I’ve found is only 7-8” and won’t reach the middle.
-
33 minutes ago, Stoffregen Motorsports said:
If you use o-rings, be sure to chamfer the holes a bit.
There are o-ring sealing washers. Best of both worlds - https://www.summitracing.com/parts/ear-178006erl?seid=srese1&gclid=CjwKCAiAi6uvBhADEiwAWiyRdpSn4FuHFOSPFK5Bswlv80AesWg6bvkmq7AP6an0s7_LZiR_9hreuhoCtIkQAvD_BwE
Oooo those might be the ticket - just for extra piece of mind.I did chamfer the holes but seems like that tap took away most of that.
Just going to have to pressure test it and see how it does.
Next is some longer hoses from the carbs and figuring out mounting the rail. I’m thinking a couple L brackets of sort utilizing the linkage mounts on the manifold. Just need to remember to leave clearance for the vacuum port for the booster (seems like a m12-1.5 threads in there nicely? But I don’t know if that truely is the spec). I may just plug that anyway and do a booster delete. I like the manual brakes on the 510- I know it takes more effort, but it’s consistent.
-
2
-
-
Fuel rail round 1
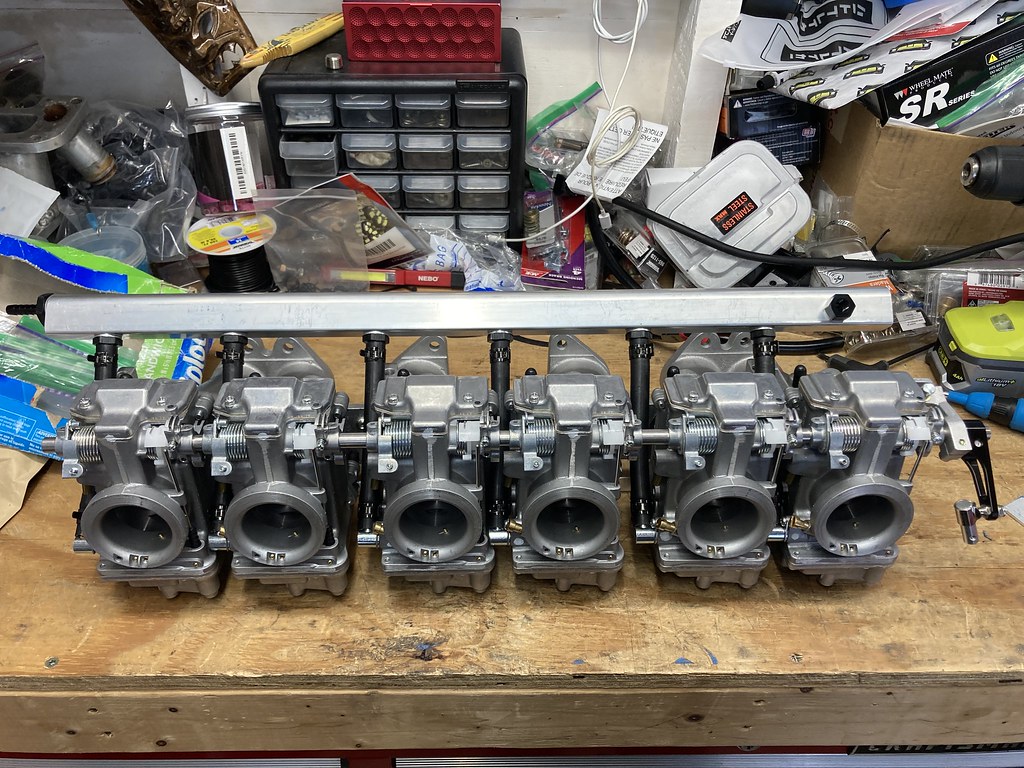
Missed one fitting- so waiting on a M14 to -6an for the right side so I can 180 loop it and run the return line back along the rail. Port on the upper right side is for a pressure gauge. May eventually utilize it for a electronic sender and run and in cabin gauge, just cause…
Hope it seals! All the fittings came with aluminum washers, but I may have to swap them for o-rings. The ends are not the flattest or my tapping wasn’t straight…
If it doesn’t work then no big deal… I accidentally double/triple ordered the rails so I have two extras. Oops…
-
3
-
-
scratch this below—- definitely too fragile based on Amazon reviews
Maybe I should just snag a sheet of this stuff?
https://www.designengineering.com/form-a-barrier-12-x-24/
Probably not stiff enough and likely to get bent/beat up just working on the car
-
20 minutes ago, mainer311 said:
Heat transfer is slower. It doesn't want to heat up as quick. I ended up using a stainless sheet on the bottom, with rock wool on top (basalt) and reflective textured aluminum on top of that. It's a product from DEI. It works great.
I saw that- I was thinking about using something like that on top of it as well. Then probably pop rivet the shield to the brackets. Do you remember what thickness you went with?Looking on their site- I’m actually using their floor and tunnel shield as a shifter hole cover in the 510
-
2 hours ago, mainer311 said:
Not sure if you bought that aluminum already, but stainless works better as a heat shield, and can usually be had for cheaper.
hmmmI did not
saw someone of the church or s30 facebook saying they had the opposite results
I guess maybe aluminum transfers the heat quicker? But cools quicker too?
-
3 minutes ago, datzenmike said:
RE: fuel overflow tubes.
You will never know if/when a carburetor suddenly starts to overflow and if directed into a catch can container it will eventually, sooner or later, fill it and over flow it under the hood.
Slide carburetors FTMFW!!!!
I had that same thought- I still like the catch can idea… thinking about maybe a clear one? With a second drain tube that runs down to the side of the frame to the ground. Or I may just run the hose all the way. -
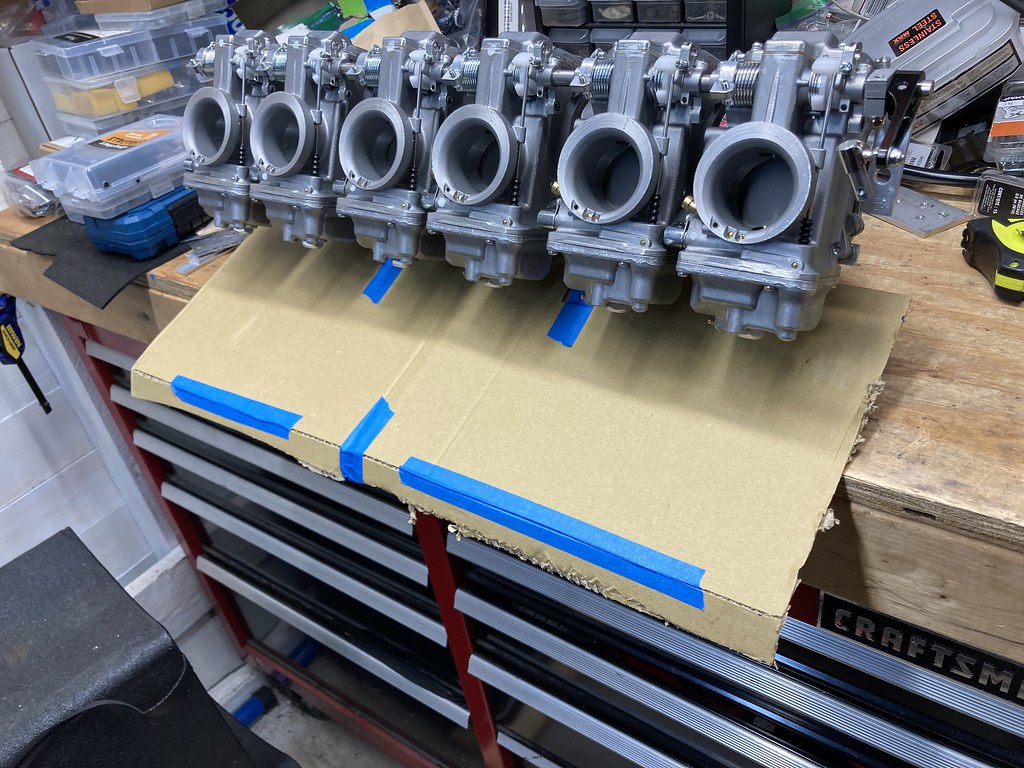
Snuck out to the garage for a bit this morning. Got the carbs back off (my L brace along the bottom makes this a bit tricky… will likely be hard to do on the car…)- drilled and tapped the manifold and got the carbs back on. Then bent up some simple heat shield mounts and cut some cardboard up.
Here is a mock up of my heat shield. Gonna order a sheet of 24x10” .05 (16g) aluminum ~35 bucks- definitely better then $100+ for a T3 shield I would need to cut up anyway. Thinking I will probably try and bend the left and right edges up a little too to help stiffen up the panel but we’ll see…

On the topic of taking the carbs of the manifold being tough… has anyone used a copper gasket? MSA obviously says to use their header gasket… but I may need to take the manifold off a few times when I first get these carbs mounted up - mains can be easily changed on the car- but pilots require dropping the float bowl…
Something like this-
https://zociety.org/product/lspec-l-series-copper-gasket/
Cost is about 10 times as much… $120 vs $12 so maybe not worth it?
-
2
-
-
Big Day Today!
@mainer311 dropped by my place with a nice piece of stainless steel - THANKS!!!!!


Couldn't wait to get to work on it so I dragged the carb set up inside and posted up at the kitchen table - 🤫 don't tell the wife I brought car parts inside 🤣
A couple carbs on and so far so good!
And we have connection! Dragged em back to garage before she got home.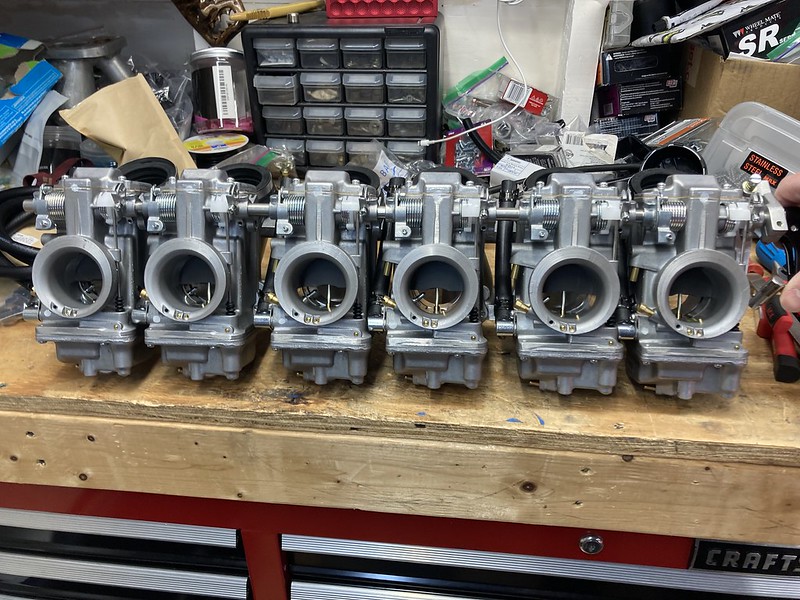

Video - Click to open and play
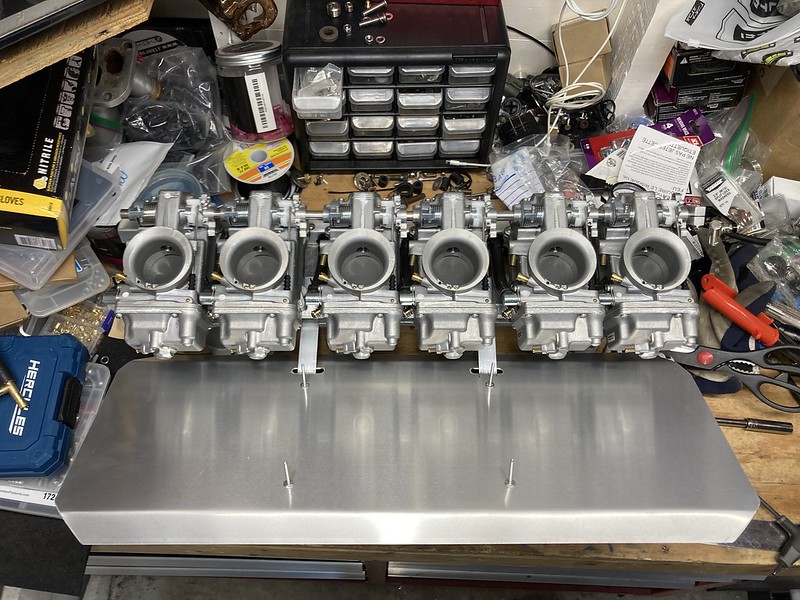
Really stoked right now that this actually worked! Impressed that miraculously my measurements were accurate. Did a quick and dirty shop vac flow test and the sync is very close! First round was between 5-9 for all 6. Did a quick 5 minute adjustment just using the play in the slide actuator arm and was able together them all in a 5-6 range. Little more playing and I think I can get them all synced on the bench. Hopefully I don't need any wider adjustments once it on the car and running,
Of course in my excitement I put that whole thing together... but forgot that I still need to drill and tap the manifold for the heat shield mounts... guess it will all have to come off again.
Thinking I am going to copy something like the T3/Kameari heat shield out of aluminum sheet since I don't need the mounting hardware or holes that either of those come with...
Just going to use some aluminum bar stock to make and angled mount that bolts to the manifold and supports the shield.
Lots of work to come!-
4
-
-
After a quick search last night it seems I may be good up to ~4psi … digging more to confirm this but that does give me some leeway, to maybe just try a deadheaded set up.
Still think a return would be nice though. Maybe just run the Carter pump by itself and run an adjustable in-line restrictor like this -
https://www.atlanticjetsports.com/products/riva-fuel-line-return-restrictor
Driving myself crazy trying to figure this out….
As for the rail - I think I’m going to follow @Stoffregen Motorsports ‘s advice and use -6/8 fittings. Thinking -8 rail with an 5/16barb/-8orb inlet; -6orb/5/16 barb for each carb. Then either a plug if I decide to dead head it- or a -8orb/-6an adapter to a -6an 180 bend and an -6an/1/4” barb to a 1/4 fuel line back to the regulator/return. I like metric fittings… but in a pinch if I needed a replacement AN fitting would be easier to find
As for brakes- I think I’m gonna roll the dice on some of the 280zx calipers. Then pick up some fresh rotors front and rear and Powerstop z23 pads front and rear (limited options for performance pads on the non vented Toyota calipers I have). This should hold me over for a bit (couple years?) till a decide on an upgrade and have the extra cash.
-
3
-
-
41 minutes ago, datsunfreak said:
Longshot but any chance your lines were swapped at some point? I know it's commonplace on 510s (with deadhead Webers) to swap over to the bigger line for "better flow".
Anything is possible on this car… but I don’t think so.SUs are fed from the outputs on the larger lower rail- as I have see on every other Z car running the stock rail. This connects to the larger fuel line from the tank.

-
Edit——
Pretty positive they are ZX which looks to be pretty hard to come by… found a pair on eBay for $100 but the quality is most definitely questionable… Rock auto has the other side for $100 for a single caliper, I guess cheaper since I do actually have a core to send in…
Side note-
Can anyone identify this caliper by sight? I think they are 280zx- the e-brake brackets aren’t the same as my maxima ones on the 510


I am going to do some digging… but need to figure it out to decide if I replace it or upgrade… With all this fuel rail talk- and suspension work to be done… I’m thinking the cheaper just replace it route may be a good option for now…
-
20 minutes ago, datsunfreak said:
My gut says a post carb regulator with a return line will be more consistent for this style of carb.
I agree- from what I have read the needle valves can be overpowered fairly easily, even when using the smallest one recommended for fuel pump usage. If that happens then the carbs overflow through the tubes out the bottom- hence my connection and routing of those. If it surpasses those then it will over flow out the side vent. A fear I definitely have.
So maybe worth just spending the money on a good regulator.
20 minutes ago, datsunfreak said:I always run a bigger return line than the feed.
Reason #1 - I don't like the idea of the fuel returning to the tank under any pressure, which could possibly cause the regulator to be inconsistent.
Reason #2 - That's how Nissan did it (I think because of reason #1). 😁
If you know how an external wastegate on a turbo works, it's kinda like that. You really don't want any restriction downstream or the regulator could possibly not bleed off pressure quickly enough.
To reason 2- Did they? Looks like the feed on my Z is 5/16 and the return is 1/4” (or whatever the metric equivalent is). From what I have read there is a small restriction in the stock fuel rail to keep pressure in the lines.I mentioned swapping to 1/4” on the return since the return hard line is smaller
-
1 hour ago, Stoffregen Motorsports said:
I don't think you need to blow the budget with a fancy regulator. Yes, I've heard of issues with Holley regulators, but ours work just fine.
As far as all the metric fittings, just get adapter fittings for the carbs and run NPT to AN fittings everywhere else. Or maybe drill the fuel rail to AN o-ring for that special touch. Regular AN is much easier to find than metric and come in all shapes, sizes and colors. -6 AN with push-lok hose/fittings would be more than enough, but I've been using real Aeroquip hose and fittings these days. Yes, it's spendy, but super high quality.
I was going to suggest using Oetiker clamps on your fuel lines, instead of all those screw clamps, but sounds like you're changing all that anyway.
The thing with the Holley regulator is it seems to be designed for a deadhead system. That was the main reason for looking at the fancier regulators since they are designed to be run on the return side after the carb. I guess I could run the Holley before the carb and then utilize a restrictor on the return line- like the Watcom one I mentioned.
The fitting at the carb is pretty specific and utilizes o-rings. The clearance between the “pair” of carbs is pretty tight to so I think I’m stuck using the Mikuni inlet and 5/16 fuel hose there- I thought about those Oetiker clamps, and may use them down the road but for now I picked up some spring band clamps which will make changes or adjustments easier. Agree the screw clamps are hideous.
Part of choosing the m14 and m12 fittings was I already have the taps for them. Seems like m14 uses a 12.5mm bit just a hair under 1/2” - and -6 orb seems to be 9/16-18 is just a hair over 1/2” (33/64)- fuel rail I’m looking at has an ID of 1/2”
Thinking about just running 5/16 fuel line for the rest of the system- I guess I could step down to 1/4 for the return.
Just looked into 6an push lock - I think I can use it for the rest of the system, but again too wide for between the carbs.
1 hour ago, iceman510 said:I switched from a Holley red and Holley low pressure adjustable regulator to a Carter pump on my race 510 last fall. I think the Holley was working fine, but I was having real pressure inconsistencies on my gauge. That said, my set up is also fuel direct to dual sidedraft Webers 45's, then return line to a regulator and back to the tank. Lots of line. Gauge is reading off the regulator, but I don't think it is reading right or my understanding of the setup in incomplete/inaccurate. I get a good 3.5 psi at start of day, but it fluctuates and drops as the track sessions continue. I actually replaced the regulator too and disassembled it. Can't find anything wrong. Really just an FYI for your consideration with the return line setup.
This spring I plan to play around with it some more and perhaps try to measure the FP at the carbs directly to see what's happening. I never had any starvation issues even when on the straight at 100 mph and would see my fuel gauge reading 0.5 psi!😱
Sounds like the Carter pump is the way to go- works for me. Price is right and I’ve used it before- also the same pump as the 510 so in a pinch I could steal one from the other vehicle if I really needed to.
Which Holley regulator are you running post carbs- the standard 12-804 low pressure one? Might be worth a shot if it’s working for you.
-
1
-


ka24de 510 driveshaft
in Drivetrain
Posted
You can pretty much see all that I cut in the earlier photos. You may not need to cut as much. Been a few years since I did it so I don’t remember exactly what was needed. If your trans sits lower then you definitely should be able to get away with less.
One of the things I don’t like about the McKinney mounts is they sit the engine very high. I’m using a generic poly trans mount. There might be a spacer under there too… to help with the angle because of the McKinney mounts and the t3 trans crossmember being too low. One of these days I’ll dig up the stock Datsun rubber mounts and try them with the aluminum spacers. 510 hasn’t gotten much love recently since my Z has been taking up all my time…