


bluexl
-
Posts
58 -
Joined
-
Last visited
Content Type
Profiles
Forums
Events
Store
Classifieds
Posts posted by bluexl
-
-
@powderfinger Well the problem WAS the battery. Car started right up. I didn't think of that at first because the battery was less than two months old, but that was the issue.
If anyone can identify the mystery cables with the yellow, white and red please let me know. For know they are still disconnected.
Thank you all for the help.
-
13 hours ago, bilzbobaggins said:
Did you disconnect the battery to do this?
I thought I did because the dome light did not come on when I opened the door, but the battery was dead/bad. But I should have been more careful here.
-
12 hours ago, datzenmike said:
The headlights have their own dedicated fusible link and two fuses at the far right side of the fuse box. Should be easy enough to find where the power is and isn't.
Won't turn over? You mean the starter does not work? Turn the key on, do the wipers work?
Mystery plugs... is one Yellow/Blue stripe and the other Black?
@datzenmike, here is a photo of the mystery plugs. They are both yellow with a white line and thick red rings.
I have a new battery and will put it in after work and update the post.

-
2 hours ago, powderfinger said:
Just as a sanity check, measure the voltage across your battery terminals! I just took the entire interior out of my 720 and redid the whole thing. After putting the dash back in and connecting the instrument cluster I tried to start the truck and nothing happened. I just knew I had pinched a wire somewhere, even though it seemed highly unlikely, or knocked something loose, once again highly unlikely. I poked around and couldn't find anything wrong. I then checked the battery and sure enough it had somehow went bad in the week that it had been sitting there disconnected. Crazy coincidence and is likely not your issue, but I didn't think it was my issue either since I had just been driving the truck 7 days earlier.
So, I took my battery to Autozone to have it charged turns out, the battery was bad and they gave me a new one. It is about 2 months old, so I did not think it to be the problem, but I will put it in after work and hopefully that was the issue. I am crossing my fingers!
-
Hey everyone, I just added an OEM clock and tachometer to my 1984 Nissan 720 dash/instrument cluster. I had already tested the clock, but I was still happy that it started working right away and it was easy to put both items in after removing the delete plates. Both plugs were there and connected without any issues. I put the cluster back in the truck, but I cannot get it to turn over. The headlights also do not turn on at all. Any thoughts on why this might be happening and which cable(s) might have gotten disconnected?
Also, can anyone tell me what these white plugs (see photos) are for? It seems like they need to connect to each other, but I am wondering what they actually control. They are located towards the driver's side corner of the dash, just above the hood release. These are the only visible plugs that I can find that are disconnected, but I believe they were already loose. As I stated above, my truck is not currently starting and the lights do not turn on when I turn the switch on. Looking for suggestions please.
Thanks in advance.


-
Thank you everyone. I was able to locate, order and replace the part. The Autozone part no. is TU100 68-005 and can be seen in the images below.


-
 1
1
-
-
Yes, it is a California car. I found one at Autozone:
HUB PART - Temperature Sending Unit
TU100 Duralast - 000019135 TU100
$18.99
I hope it is the correct part.
Thank you.
-
1 hour ago, datzenmike said:
The temperature gauge sender is 25080-89900 and mounted close to the thermostat. Take this number with you to an auto parts store. they can probably cross reference it.
The engine coolant temperature sender was used by the feed back carburetor's control unit. It supplied information as to how warmed up or cold the engine was so that the mixture ratio could be properly tailored. For the '84 it was 22630-V5010. Earlier ones were near the thermostat also but later ones were in the head near the exhaust side number one spark plug. These gave a faster more accurate indication.
Thanks! I am taking this info to the parts store.
-
Hey everyone. A mechanic who worked on some electrical items for me, and seems to have done a really good job told, me I need a new temperature sender unit. However, all I can find is a temperature sensor. He said that was not it. Can anyone offer any input/guidance on finding a "temperature sender unit" for a 1984 Nissan 2WD truck? Thanks.
-Frank
-
2 hours ago, datzenmike said:
You can run with or without I never seen to notice the difference. I think today's electronics filter out the noise on the +12 anyway. Will it cause this problem, I don't think so.
Lifetime warranty sounds good but it doesn't pay for the tow home or being left stranded in a sketchy ghetto while picking up some crack, at night... in the rain. It doesn't pay for lost wages. It doesn't pay for your time to replace it in the snow or the taxi to take it in for the replacement and then back home again. I know people who are on their 4th alternator and they think they are getting away with something. It's way cheaper to buy a good one, (if there are any) or get a used original one from a wrecking yard.
Thank you. This is good advice. I will look for one.
-
20 hours ago, datzenmike said:
'New' alternators are not new and are barely cleaned, with bearings and brushes changed. It's called re manufactured and why they are $60 when a dealer original are close to $400. It's not uncommon for 50% to be 'bad in the box'.
If your old one works why are you putting this 'thing' in???
Never throw the old one away if original or turn it in for the casting. It can always be properly rebuilt.
So to clarify, the old one went into my 85' 4x4. That is why I still had the old one. The new one went into the 84' Sunrader. The one that was in the 4x4 was bad and it was turned in as a core. I wish I would have known that it was better to keep it. I can exchange the new one as it has a lifetime warranty, but does the fact that it does not have the "condenser and or noise suppressor for the radio" make a difference? Do I still need this part?
Thanks.
-
8 hours ago, KELMO said:
condenser and or noise suppressor for the radio
Thank you.
The new Alternator does not have it and installed it without it, but the Battery light came on. It was brighter when I stepped on the gas, but it would not turn off. I put the old Alternator back on and the problem stopped. Does the new alternator require me to put this part on it? Or is it just a bad alternator?
Thanks.
-
1
-
-
Hey all,
What is this cylinder looking part (See Image) that connects to the BATT termoinal on the Alternator? I purchased a new alternator and it did not include it. Was I supposed to swap it from theold one alternator to the new alternator? Can a new one be ordered?

Thanks!
-
1
-
-
10 hours ago, Gofer said:
That looks great, nice to have seats that can just bolt in ... after some detail work. What did you use to dye the seats? I will most likely have to do the same when I get new seats for my daughters 720.
Question about this option ... what years of the Rodeos will bolt up? I have a scrap yard with a pair of 2001 models that would be good for picking up a set.
The plastic die that I used is: SEM Products 15173 Camel Color Coat - 12 oz.
Like @Charlie69said, take some measurements. I personally looked for a 96 to 99, and found a 96 at a scrap yard near me. But if you read through the post below from @mx71you can read some of the experiences from other members. I had no issues with my seats. They fit perfectly for me.
-
2
-
-
We had some really good looking seats in our 84' 720 Sunrader. The cab looked really good, minus the console, which we are working on at the moment. But the seats were definitely not comfortable, something we learned when we first bought it and drove it home 7 hours. Being that it is an RV and we have several long distance trips that we have taken and plan to keep taking, we decided to swap them out for Isuzu Rodeo seats. The seats are a direct bolt in swap and the comfort/support is a huge difference, but we really hated to change the way the door panels and seat upholstery matched. So, below is what we did. Photo one is what the seats look like now.
Photo 1.

Photo 2.

Photo 3.

I also took the seat bolt covers from the donor car as you can see in Photo 4. I used a plastic die to color all seat plastic: SEM Products 15173 Camel Color Coat - 12 oz.
It turned out pretty good and we will see how the color holds up, but I used it to restore the steering wheel plastic and its has looked good for the last 4 months. The black cable that you see in Photo 4 (bottom left) is for the seat warmers which are on both the seat bottom and the back/lumbar section. I have not wired those in, but will update when they are wired working.
Photo 4.

In photos 5 and 6 you can see what we started with for both the 720 OG seat and the Isuzu Rodeo Seat.
Photo 5.

Photo 6.

n photo 7 you can see what the plastic portion of the seats looked like before it was removed and painted.
Photo 7.

The seats are a direct bolt on, but to properly adjust the seat position as it pertains to sliding forwards and backwards, you will need to flip the ECU box upside down, and bend the rear screw mounting backet downwards so the the seat can move feerly. (See Photo 8).
Photo 8.

Overall, we are happy with the comfort upgrade, and love that we did not change too much of the original styling. I know the DAtsun/Nissan purists might be cringing, but its a Sunrader, so its already outside of the 720 purist box if such a thing exists.
Thanks for looking.
-
2
-
-
On 8/22/2021 at 12:18 PM, NC85ST said:
Just curious, in what way are the hose ends different, that go to the compressor?
And I’m unfamiliar with what this is and how it works.
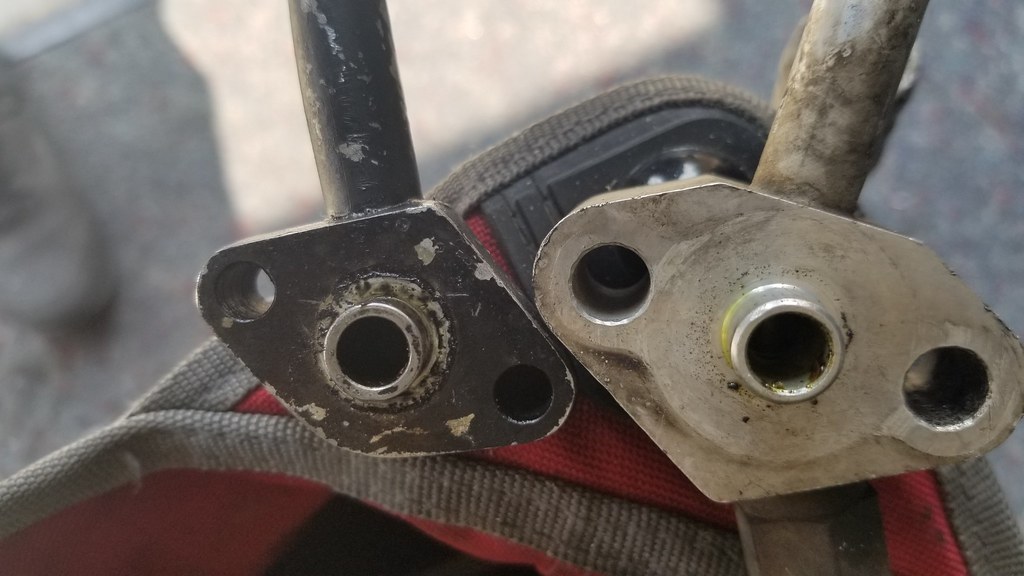
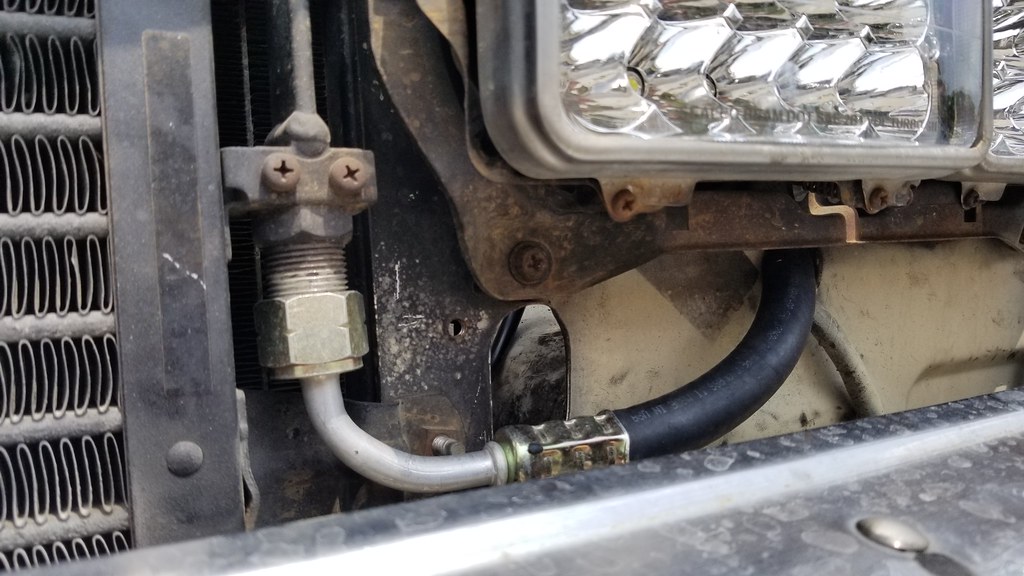
The a/c system on my 85 is sealed up good, but the compressor squeals like crazy above idle. I’m thinking that going with newer parts might be a good idea in the long run. That’s why I’m so interested in this.If you have your old high pressure hose you would change the mount that mates to the compressor (see image 1 for differences). That is the only change you will need to make to this hose. I changed both ends on mine and kept the newer charging port because I did not have the old hose to begin with. The older hose mount holes do line up f you wanted to give it a try, but I was worried that there would be a leak, so I went with the matching end. You would keep the same mount that mates to the condenser if you have your older hose. If you wanted to keep the newer style hose with the charging ports, that is the only reason to use the modified end that includes the metric beadloc female O Ring 45 Degree M20 x1.5 mm nut to hose adapter. Since your existing system has the port over by the dryer, you don't really need it, so you just convert that port to the newer style using a R134 conversion kit.
Image 1. L: 84'/85' style high pressure hose to compressor mount. R: Newer style high pressure hose to compressor mount.
Low Pressure Hose
The low pressure hose from the end that attaches to the evaporator at the passenger side firewall to the end that attaches to the compressor will be used from a 86 to 96 D21 donor truck. You can also use the compressor from these same trucks as the mounting bolts are the same, though I purchased a new one for just over $200, at partsgeek, part no. Four Seasons:8242-05040532.
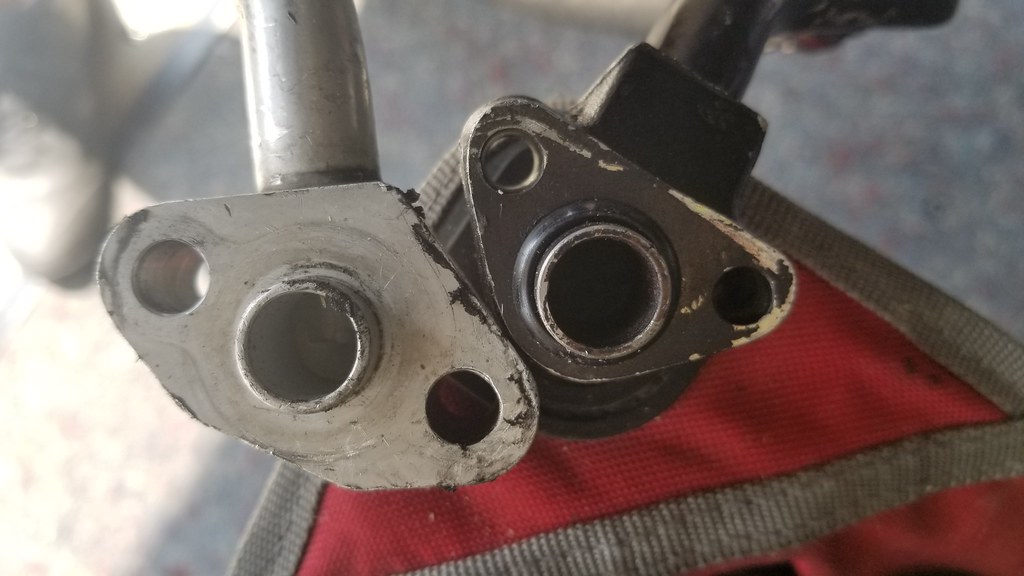
You cannot attach the 84/85 low pressure hose to the newer compressor as the bolt holes do not line up (see image 2). I used a pipe bender to bend the newer style hose pipe a few degrees upwards to avoid the steering box. It was simple.
Image 2. L: Newer low pressure hose to compressor mount. R: 84'/85' older style low pressure hose to compressor mount.
Make sure to take a couple of mounting brackets like the one in image 3, as well as several mounting screws that are shown in image 4 (I just took some extras from the truck at the wrecking yard).
Image 3.
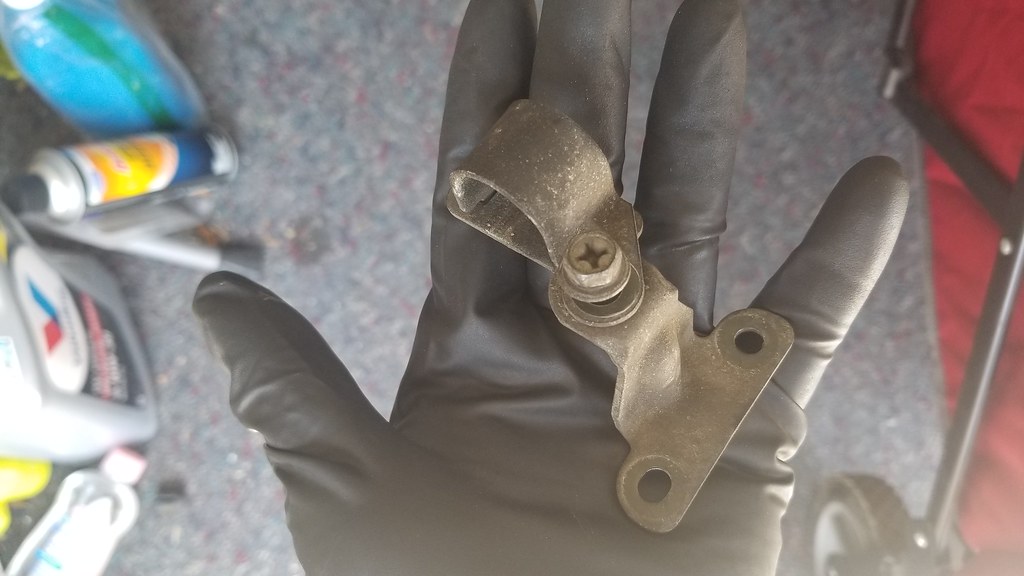
Image 4.

Everything should bolt on without issue, once you make the bend to avoid the steering box. The only other thing I did is referenced in my earlier post, and that is to add a heat shield where the high pressure hose is a bit close to the manifold.
Hope this helps you.
-
On 8/19/2021 at 9:28 PM, Charlie69 said:
From the picture of the 84 it might be a dealer installed unit. I say tis because of the steel nut all the factory AC I have worked on are like the 85 picture including 1980 720 up. 2wd and 4wd are the same except hose routing. 85/86 had different compressors from earlier models..
I think you are right because, am I crazy or is the expansion valve inside the engine compartment (see item 1. in image 1.)where the high pressure line meets the evaporator port? o I might not have to get into the interion box to change the valve after all, atleast not on the 84'.
Image 1.

-
1
-
-
On 8/18/2021 at 8:05 AM, NC85ST said:
I hope this helps. I would like to know more about what you did under the hood. Using Pathfinder lines and an ‘86 compressor? Any modifications to attach to the evaporator? Use the ‘84 a/c mount, for the compressor, on the engine? Also where is the dryer mounted?

Thank you for sharing this.
-
1
-
-
@powderfinger and @NC85ST. I will post images of what I did both for the 84 720 Sunrader and for the 85 720 4x4 when I am done. I am working on the A/C for both, so they are set up similarly. For now the Sunrader is ahead in line so I will finish that one first. Hopefully.
The low pressure hose ends that meet the evaporator in the 84' and 85' are different from each other in that one is female and the other is male, so the 86 setup did not work on the 84 Sunrader. It could be specific to the RV, I don't know. (See image 1)

In the 84' Sunrader I amd using the pathfinder low pressure hose. However the end that mates to the compressor will need to be swapped out to that of an 86 D21. I used the original High Pressure hose, but swaped out the end that mates to the compressor to fit the newer style compressor. The 84/85 Hoses will not mate to the 86 and newer compressor.
In the 85' 720 4x4 I use a complete 1986 D21 low pressure hose setup that comes from the evaporator to the compressor. The end on the low pressure hose where it bolts to the compressor is bent upwards about 20 degrees to avoid the steering box(same for the Sunrader). I used a heat shield on the high pressure hose where it almost touches the manifold (image 2). The high pressure discharge hose and valve were used (image 3), but with a modified end that includes metric beadloc female O Ring 45 Degree M20 x1.5 mm Nut to hsoe adapter. (See image 4).
The dryer and condenser are new OEM styled pieces. Nothing was changed on them other tha R134 fittings.
Image 2.
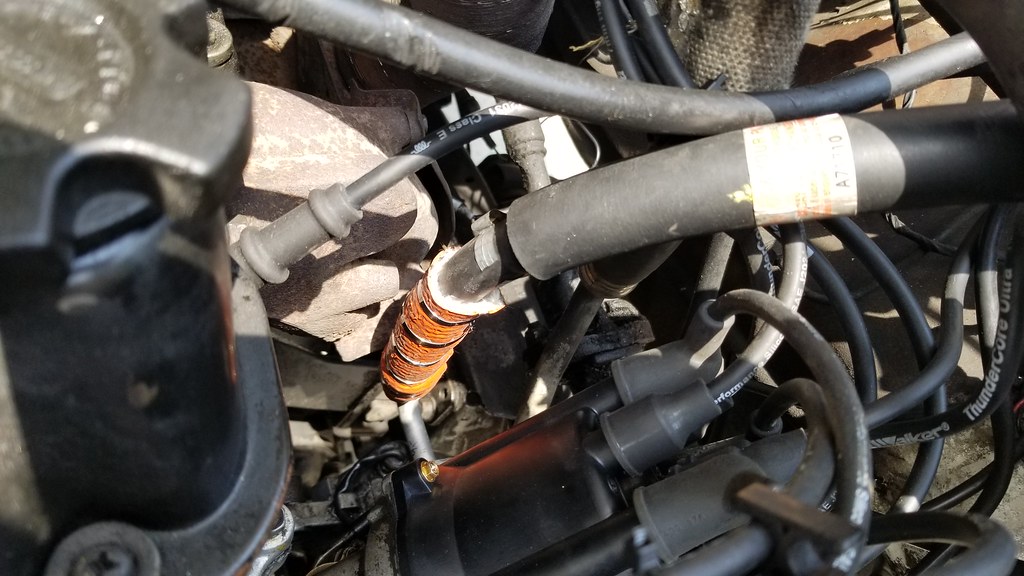
Image 3.

Image 4.
-
1
-
-
43 minutes ago, Charlie69 said:
Here scroll down to find the correct year. The expansion valve on a factory AC is metric threads some of the dealer installed ACs have SAE threads. Pictures of your setup will help me tell if factory or dealer installed. I have owned both over the years.
https://www.partsgeek.com/mmparts/ac_expansion_valve/nissan/720.html
Thank you, I ordered the part from Parts Geek last week and have it on-hand. Just need to do the install. Parts geek is also where I got the nes compressor and dryer. Thanks for sharing
-
1
-
-
4 hours ago, NC85ST said:
I have on my ‘85 ST. It’s somewhat of a pain. It’s under the dash attached to the evaporator, which is inside a two piece plastic box, held together by several spring clips. The ones on the back side, of course, are the hardest to get to, especially when you go to put everything back together. Once you get the box opened up, it’s easy to replace. You can take a utility knife or razor blade to cut open a tar-like substance that the expansion valve probe is covered with. I think that there is a clip holding the probe to the a/c line also. It’s been a while since I did this. Hope this helps.
This is helpful, thank you. Is it the box under the dash that is closet to blower motor, or is it the box right behind the console/shifter?
Thanks again.
-
1
-
-
14 minutes ago, Charlie69 said:
Being an 84 it should be carbed.
Yes it is carbed.
-
1
-
-
11 minutes ago, datzenmike said:
That a Z24i engine????
No it is a Z24. The air cleaner must have been swapped at some point with a z24i.
-
1
-
-
Has anyone on here changed out the AC Expansion valve on their 1984 720 truck? Mine is an 84' Nissan 720 Sunrader (Mini RV). I have the Haynes Repair Manual, but they do not suggest a home mechanic work on the A/C due to the refrigerents, so it is not of great help. My system is already free of refrigerent as the compressor and compressor hoses were missing.
I installed new metal lines out of a pathfinder that run across the rear along the firewall, and I built new compressor hoses using the ends of an 86 truck to mate them to a new 86' compressor. I have a new condensor and drier as well.
The only piece that I am not sure how to change at this point is the expansion valve. Any help would be greatly appreciated.
Thanks!


-
1
-

Dash Components: Identifying Electrical Plugs - 1984 Nissan 720
in 720
Posted
Thank you @datzenmike.