


jfbrink
-
Posts
183 -
Joined
-
Last visited
Content Type
Profiles
Forums
Events
Store
Classifieds
Everything posted by jfbrink
-
Troy, When I replaced mine on my 411 sedan, about 8 years ago, I could not find end or center bushings that would work. So, I did the following: -End bushings: Cast my own using castable urethane with a softener to get the hardness down to about 70A -Center/locator bushings: The same. This was a tricky mold to make. -Links: I found a generic link kit with bolts, spacers, washers and bushings by measuring the stock ones and scrolling through an aftermarket car parts website; they fit perfectly. They were still holding up perfectly when I sold the car last year. The entire process took a few days and taught me urethane casting, which I've used many times since. Jesse.
-
Well, it looks like I have bigger problems than bad bearings. The inner race fell right off after I cut the collar free. Both the axle and the spacer are heavily grooved. Anyone in LA area have an extra axle they could part with? Jesse.

-
So, I've finally gotten around to replacing my bad rear wheel bearings. I knew I had delayed too long when I realized I could tell how fast I was going by the pitch of the bearing whine. The driver's side bearing is full of rusty goo. It looks like water was getting in between the differential flange and the backing plate. Is there any reason that I shouldn't seal this joint with a thin layer of silicone sealant? This side has no shims. The passenger side, which still had viable grease in the bearing, has one shim. What do you all think? Jesse.
-
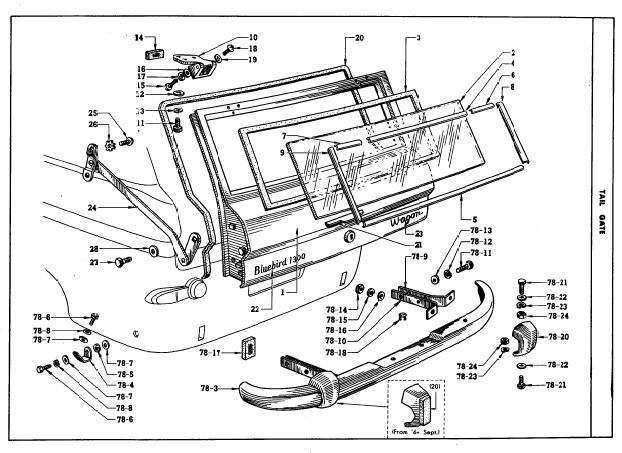
Here's an update on the 411 wagon inner hatch seal experiment. First, I bought Steele Rubber's 70-0129-99, which is a rectangular profile soft foam measuring 5/8" x 1". I have a special case issue, which is that one corner of my wagon was poorly repaired decades ago, so that it has a much greater gap to the hatch than the other. So, I needed that 1" thickness there, even though the gap is much less elsewhere. Once trimmed, I faced two issues. The sharp rectangular profile did not look automotive/OEM at all. It looked like a storm door. And, even trimmed down, and being a soft foam, it offered a LOT of resistance to closing the hatch. So, I next bought Steele Rubber's 40-0480-73. This is a 5/8" x 7/16" soft foam with a "check mark" shaped section. I used a trimmed length of the 70-0129-99 to fill the excess gap in the one corner. Then, I was able to run the 40-0480-73 around the entire channel without modification. I have not yet glued the weatherstrip into place. It is just held in with masking tape. The hatch opens and closes nicely, because the seal is created by bending the leg of the check mark. Before I installed the weatherstrip, CO levels inside the car were between 20 and 40 PPM, depending on driving conditions. With the weatherstrip installed, they are 0 to 10 PPM, depending on driving conditions. Cruising on open road best; accelerating from stop sign/light to stop sign/light is the worst. Window open / closed / cracked doesn't affect it much with seal. Window cracked / open is actually worse for CO without seal; I assume it's sucking the CO forward in the cabin. That's my report for now.... Jesse.
-

Time Left: 10 days and 10 hours
- WANTED
- NEW
Hello, I need a left and right pair of working wiper pivot assemblies for my wagon. I don't need the arms, but if it's easier for you to leave them attached, that's fine. Let me know your price. Jesse. P.S. I accidentally marked my previous post "Complete" because I thought it meant I was done editing!Ask for price
Los Angeles - US
-
I've managed to fix everything that went wrong at the exhaust shop, except for the shift linkage. I still don't understand what happened, but since I'm the only one who drives the car, I am fine to shift to N for R and L for D until I have a chunk of time to dig into the problem. I'm driving it daily, even though the decayed hatch seal fills the car with exhaust. It looks like I'll need to rethink my A/C condenser location. Putting it in front of the radiator really limited my fan options; there is just no space up front. And one 12" fan with no shroud can hold temperature steady, but the fan never shuts off once the thermostat fully opens. I think I'll have to go with two little condensers set down low near the sway bar. Jesse.
-
Well, I bit the bullet and bought a universal extrusion from Steele. The stock seal is very nearly rectangular and measures roughly 5/8" x 3/4". Steele and other suppliers had lots of options that were 1/16" under on both dimensions, which seemed the wrong direction to me. So, I went with Steele's 5/8" x 1". If it doesn't squish sufficiently, I'll make a little tool to slice it down. I'll report back once I've tested it. I sure hope it solves my problem. I just replaced the entire exhaust system, and if that had any effect, it made things worse. We'll see. Jesse.
-
@MikeRL411 - Still thinking through what my solution to the cowl drains will be. I was able to retain them in previous swaps, but this engine was just a tad too long.
-
I looked into this both because I wanted headrests and an adjustable back. What was clear very quickly was how narrow the 411 seats are. One donor option that seemed like it might work and not be too modern in profile was the MGB. First generation Honda Civics are also a possibility. As I recall, everything else was just too wide or too incongruous looking.
-
@Datsunscom - Well, I'm not finished, yet. I am actually pretty judge-y about engine swaps that don't bother with the heater and hot rods (or cars of any kind) without wipers, so it's a bit of a sore point for me that I haven't been able to get around to these two items, yet. No wipers because I don't have a good set of the cast pot metal stands/surrounds that sit on the cowl. If anyone has a pair they are willing to sell, please let me know. But, the stock motor on the stock mounting plate will fit fine. I just need to make a removable tab to take the two lower mount screws. The stock tab that was welded to the firewall got in the way when moving the engine in and out. No heater because I am building a custom heater/air conditioning setup for the car. This involves a blower box from a Geo Metro that I've already modified and mounted under the stock heater air intake and a metal box to hold the heater core and AC evaporator, along with a defrost/room flapper. I've designed the box and built in in cardboard, but I moved to a new house before I could fabricate it, and it will be months before my workshop is usable again. I'm pretty bummed because when I drove the car to the exhaust shop, and it was so quick and smooth. A delight. But, when I went to pick it up, the ignition switch was broken, there was a massive vacuum leak that I can't locate, the entire brake pedal had fallen off and the shifter mechanism was totally jacked. This is the fifth engine swap I have taken to this shop, and I like their work, but this time around was a disaster. Thanks to the move, I haven't had the time or the space to deal with any of these issues. Such a drag. Best, Jesse.
-
Yeah, my hope was that someone had figured this out already, and I wouldn't have to be the one buying various profiles of extruded dense foam until I found one that fit. The 411 has an inner seal, set in a channel in the body, that appears to be a fairly simple rectangular profile. I think this is the one that keeps exhaust out. Then there is a more complex outer seal, attached to the hatch, which I guess is for keeping out rain. The outer seal in 67 wagons is rather complex, with semi-rectangular sides and a wing-shaped upper edge. @Duncan - Makes a point that has me hopeful. I'm just about to get a new exhaust for the car now that I've finished my engine swap. The old exhaust could easily have been leaking surreptitiously as I'm fairly certain it was original to the car and had definitely seen better days. I'm surprised there are no 411 wagon folks have who haven't already run around this mulberry bush? Jesse.

-
Has anyone found a good solution for replacing the weatherstrip around the hatch in their wagon? An amazing amount of exhaust gets sucked into mine, and driving around like this really limits utility:
-
Okay, gang, the wagon runs and drives. I need to take it to the exhaust shop before I can really shake it down. It is very, very loud. But, everything seems to work as it should so far. Once I have exhaust (next week) and have driven around a bit, I will post a video. For now, some wrap-up pics. Overview of completed engine bay. It's all really packed in there: Dual line brakes with all new copper lines and the Blue Hands front disk kit. Inexpensive turbo manifold from eBay to save me having to fab a manifold that would clear the steering box. Honda motorcycle coils. An eBay aluminum radiator and fans from Mishimoto: On the right side we have a Kia Soul fuse box, a super-compact cobra head intake elbow from a Kenworth semi truck, and a universal throttle cable from Control Cables. I still need to take the harness out once more and wrap everything: The ECU, TCU, Deutsch bulkhead connector for the 42 wires and the bulkhead stud for the remote battery. Oh, and some un-patched holes: The aforementioned remote Miata AGM battery. Just on the far side of the battery is a 200A circuit breaker that I can easily switch through the side access panel without lifting the deck: That's about it until I make a video. Thanks for looking. Jesse.
-
Hey, gang, Time for another update, this time with photos. Essentially, I have the following tasks remaining before I can drive, at least around the block: -Mount ECU and TCU -Finish engine harness -Fabricate rear battery mount -Fabricate downpipe for O2 sensor -Mount cooling fans -Wire front turn signals (and probably headlights, horn and window spritz, since I'll be right there with wire) -Fill with fluids, bleed brakes Here's an overview shot showing where I'm at as of today: As we all know, the engine bay in the 411s is super short, front to back, so fitting radiator, condenser and intake tubing was tricky. The key component was the "cobra head" elbow that comes off the manifold. It's from a Kenworth semi truck of all things. At the bottom of the below image you can see the condenser, which is from a Geo Metro, which is the source for most of my A/C components. It's mounted with "headless" bolts I made, which pass through short lengths of vacuum hose so the condenser "floats" somewhat. The radiator is an aftermarket eBay three-row meant for MK1 and MK2 Volkswagen Golfs. It's turned upside down and hard mounted as shown: A variety of hoses assembled from my hose bag and a trip to the parts store with some bent hanger wire: The 411 doesn't offer very good paths for EFI fuel lines from the front to the back of the car. I moved the brake line to the left side of the tunnel, along with the fuel return line. I kept the wiring on the right side of the tunnel and added the fuel supply line: I was surprised and delighted to discover that the stock A/T gear selection indicator is luminescent: I like to have hazard lights, which is easy to do in the 411 using a spare headlight switch, spare flasher pot, the unused lighter hole and a heater fan knob painted orange: Here's hoping my next update will include a driving video.... Jesse.
-
Here's a brief update with no photos, so not much of an update at all? Since my last post, a guy talking on his cell phone rear ended my Corona Coupe, so it's off the road indefinitely. A real bummer, as I doubt I'll be able to fix it. Two years of searching for the car, two years for my slow build and then two months of driving it. Oh, well. Now my daily driver is a 1960 Studebaker Lark, so I can't complain that much? I just hope I get an acceptable amount from his insurance company. Meanwhile, here's what I've done on the 411 wagon swap: -New fuel supply and return lines -New brake lines -Modified 2008 Kia Soul fuse box (holds all the necessary fuses and relays for old and new circuits) -Oil pan cut and patched -Custom drive shaft fabricated -Stock 411 A/T gear selector joined to Miata A/T (via Geo Tracker cable and various custom brackets) -New rear wire harness At this point, I'm aiming to make it run, drive, stop so that I can move the car. Basically, that means that everything will be done, but the engine/ECU harness will be very messy. Remaining to do before test drive: -Cast custom thermostat housing -Reinstall oilpan (this is a hassle on the Miata engine) -Return engine to car (probably with some tunnel clearancing for shifter mechanism) -Figure out mounting for A/C condenser -Figure out mounting for radiator -Plumb radiator -Temporarily graft coil igniter to engine/ECU harness -Temporarily graft engine/ECU harness to fusebox -Bleed brakes Not a terrible list, but I have a lot of other stuff going on, so we'll see how long it takes. Jesse.
-
@Datsun Dude - I ended up putting that engine and transmission in my '68 Toyota Corona Coupe, which is now my daily driver: But, I have a 1999 1.6L Miata engine (not available in US) with automatic that I am currently installing in the 411 wagon. I have engine and transmission mounts done, fuel tank modified for EFI and new driveshaft made. I've swapped in the 411 A/T column selector from my parts stash and have modified the Miata transmission so that they work well together with a Geo Tracker shift cable. This weekend I am running new brake lines and new fuel lines, and hopefully installing the fuel filter. That will clear the way for doing lots of wiring next week. Because this swap is pretty straight forward, I added a side project of building a custom HVAC setup for it. It uses A/C and heater components from a 1995 Geo Metro (the smallest I could find among JY cars) and a custom airbox to hold the condenser and heater core. It is very compact. The stock switch runs the fan, and the stock levers will control... something. @Pedro - The steering centerlink requires this notch in the Miata oilpan, the same as what I had to do for my Corona. That's the only modification needed. The front crossmember stays the same. I have to modify the transmission tunnel for the A/T, but the manual transmission did not require tunnel mods to fit. You would want to modify the Miata 5 speed shift turret, though, to move the shifter about 4" forward. It's a pretty easy process. Here is the modified fuel tank. I added a late 90s Honda EFI fuel pump assembly, modified for the Datsun's deeper tank. I also have a handmade sump tray in the tank. I soldered a 8mm quick connect to the Honda's 6mm return pipe because the Miata lines are all 8mm. I could have installed the Honda pump with just a 2.5" hole and six studs welded to the top of the tank. But, years ago, before I had these tank conversions figured out, I cut a big hole in this tank that I needed to patch with the plate. I will need to make a little cover for the new fuel gauge sender access hole. I'm trying to get this done fairly quickly. I'm moving in October and don't want to have to tow this car! Once I have it running/driving I'll post more details about the process. Jesse.
-
Hello, All, I am back to swapping an engine into my '67 wagon. I had posted a while back about putting a 2000 JDM Miata 1.8L and 5 speed into it, but that engine ended up going into my '68 Toyota Corona Coupe. I happened to buy a 2000 JDM Miata 1.6L with automatic for a few hundred buck off eBay around that time, so it's been waiting to go in the wagon. The fit is great. I'll post details about the swap later on, but for the moment I have a question about what angle to give my engine. With the engine in the car, and the car level, I measure the angle of the pinion yoke face as 0 degrees. Now, I know the stock engine was angled down quite a bit, but it's long gone and I can't find my measurement of what that angle was. Does anyone know the downward angle of the stock engine? Is the assumption that the wagon will get loaded heavily, tilting the pinion up from zero to have the correctly corresponding angle? Or did removing the helper springs somehow (I can't see how) change the pinion angle? Would I be better off setting my swap engine at 0 degrees to match the pinion yoke? Jesse.
- 1 reply
-
- 1
-

-
Eiles, I don't know if the shipping to AUS would be an issue, but I bought a kit from Stock Interiors for my 411 wagon and am happy with the fit. Would be the same for the sedan. I actually corresponded with them about a few details on the rear portion of the kit, and I believe they improved their pattern in response. I ended up putting the front half of the kit in my wife's 520 pickup, and it fits the contours fine there, but is about an inch or so too narrow on both sides. Which makes sense, given that the trucks are wider. Still, it is much better than nothing in the truck. I'm getting the wagon on the road, again, and am planning to buy another set from Stock Interiors so I don't have to steal the 520's carpet back. Jesse.
-
I dug into search and found that my post on adding 3-point belts was not as informative as I had hoped, but it does show the aesthetics: The install is not hard to do. Buy 2 or four of WesCo's 3-point retractable with chrome release: https://www.wescoperformance.com/3-point-seat-belt-chrome-retr.html And 2 or four of their 3-point retractable hardware kit: https://www.wescoperformance.com/3poremokit.html Remove the B-pillar trim and mount the WestCo upper plate as shown. Not sure why this insists on displaying rotated. Note the two pop rivets for holding it in place. Not 100% necessary, but handy: Mount the lower L bracket to the floor, an inch or more behind the centerline of the B-pillar to allow the seat to go all the way back. Note I mounted the reel to the upper part of the L and the tongue to the lower part of the L: Here is a view of the underside of the reel mounting, inexplicably rotated 180 degrees: I've been using these in my sedan and wagon for many years. The rears are a bit trickier in both cars. Jesse.
-
@mklotz70 - The squealing started maybe a year into running very heavily worn stock rotors. But, it continued without change with NOS rotors and a new set of pads. The "goo" did not do me much good. Like most attempts to fix the problem, at the start of the drive, I think "oh, it's better now" and then by some point in the drive I realize, "nope, still there." @]2eDeYe - Hey, here is a photo of the M/C in place. I can take more later in the week: Engine Bay Overview with Dual M/C
-
Hey, gang, I forgot that I had a second theory on why this might be happening that I wanted to run past you all. I am using a 77-81 280zx disc/drum master cylinder with my stock RL411 discs. I chose it because it fit and provided a dual circuit setup, which I preferred over the stock single circuit. Because of the area ratio of the M/C plunger to the caliper pistons, the force required at the pedal is VERY high. I was wondering if somehow this could contribute to the squealing somehow? In contrast, I have this same M/C on my Mike Klotz disc conversion on my wagon, and because of the larger caliper pistons, the force required at the pedal is very low. Coincidentally (or not) those brakes don't squeal at all. Jesse.
-
@Lockleaf - Thanks! I hope to get back on this project soon. I'm almost done with my engine swap into my Corona coupe.
-
MikeRL, That's an interesting idea. But, I see no sign of rubbing and the problem happens with equal frequency between my ancient black spring plates and my relatively new silvery spring plates. Mike K., I have not figured this out, yet. It's very inconsistent and yet persistent, so it's super frustrating to diagnose. It almost never happens at the start of a drive, and sometimes it doesn't happen at all regardless of distance or braking frequency. And, often after happening for a while during a drive, it will just go away again. Other times, once it starts, they squeal for the entire rest of the drive. The only nearly consistent element is that it happens at medium braking, not really light or hard braking. Obviously, being factory brakes this should be something I can fix. But, I wonder if current aftermarket pads are dimensionally off in some way? Meanwhile, I have your kit on my wagon and the brakes are quiet as little mice. Jesse.
-
The Ackerman is correct; the orientation of the first photo is front of the car towards the top, and it's steering a bit to the left. I hadn't thought about the u-joint phasing, thanks for bringing that up! I indexed to a crack in my steering wheel and turned lock to lock a few times and got 2.5 each time, which did seem fast to me.... I think I'm putting this project on hold again to do a quick engine swap into my '68 Toyota Corona coupe, but I'll be back around to this, as I want the wagon back on the road.... Jesse.
-
This project got put on the back burner for a bit, and then it took me a while to figure out how to mount the rack so that it would be adjustable, removable and allow the crossmember to be boxed in again. But, it's all mounted, now, and I'm moving on this week to making a bracket to hold the lower end of the steering column in place, where the steering box used to be.


