


jackedaw11
-
Posts
62 -
Joined
-
Last visited
Content Type
Profiles
Forums
Events
Store
Classifieds
Posts posted by jackedaw11
-
-
Day 7 - TIG Welding FUN!
I'm pretty new to TIG welding; I'm not very good, but its FUN! I've been working on the motor mounts and the mounts for the rack and pinion. I'm using the old crossmember as a template. I wanted to redo the way I did the motor mounts so I started by using cardboard to make mockups. The holes for the sr20 mounts need to be approximately 19.5 inches apart, and about 5 inches above the bottom of the crossmember (don't take my word for it, my measurements may be off...). And the faces which the motor mounts will bolt to need to be at about a 45 degree angle.
My trusty little harbor freight tig welder, It works really really well and I added a foot pedal to it which makes it work even better!

Here's what I have so far:
I have the uprights done, and the mounting face welded together. The upright is about 2" tall, and the mounting face is about 2.5".


I also started messing around with the mounts for the rack and pinion. I'm using .12 wall 4130 tubing, and .125 thick 1018 for the flanges. I cut the tubing in half, and welded on flanges, which I'll use to bolt the two halves together. The tubing I used is 2.00" od and I think they're too big. I'm going to try this again with some smaller tubing, for a better fit.
My materials, the big black rod is a 2.5" chunk of delrin which I'll be using to make bushings.

the tubing cut in half, I used a bandsaw

clamped in place for welding:

Tacked:

Welded one side:

Flipped and welded the other side

Finished product:

-
Days 5 and 6 - WOOOOOO!
So much progress! I know this is the easy part but its still insanely exciting to see so much get done. Over the past couple of days I've completely stripped out the car, and started work on my new crossmember. Engine, transmission, fuel lines, brake lines, and the front end are all out now. I'm just about ready to start sanding the paint off and getting some bodywork done.
removing the tail lights and the gas tank.

POSIN' HARD!

tail lights out, getting the gas tank out

Pulling out the engine! IT'S A BEAST!

my dime all emptied out and on dollies, it's crazy light, I can pick it up by the core support and roll it around by hand.

I had already flipped my crossmember, so the next steps are to cut off the old motor mounts, build some new ones, and build a mount for the rack and pinion.

I used a die grinder and a cut off wheel to trim the mounts off as close as possible to the crossmember, and then cleaned it up using a grinder.

-
ok. make an offer, they're still in my parts car and i won't need them. the backs are ok but the bottoms at least will need new covers. i'm new here and don't know how to post pics but i can email you.
PMd you my email.
Ben
-
Days 3 and 4 - More Progress!
Man, this car is coming apart FAST! I wish it was this easy to put it together!
Yesterday and today I kept working on stripping stuff off the car. As of tonight the doors, fenders, valance, all the glass, the seats, the dash, and the wiring harness is all out. I'm really happy with all the progress I've been making so far.
Day 3
Pulling the doors was pretty easy, I learned a trick (which is probably common sense to everyone else). Putting a jack under the door to support it makes it much easier to remove the door.

Once I pulled the seats out it felt like I was making some serious progress

I also removed the harness bar that I had built (the rusty thing in the picture), this will get repurposed into a bench grinder stand :)

Day 4
The wiring harness was a total pain in the butt, I had soldered some connectors through the fire wall and it was a total mess. Funny thing is, I was really proud of the electricals when I first put them in. Now, I'm convinced that it needs a complete overhaul.


This picture makes me soooo happy, getting that wiring out was a huge hurdle.

Some Problems
Now that I've pulled a bunch of crap out of this car, some of the problems are starting to surface. One of the big issues is the way the fenders have been cut, and how the flares were attached. I need to reweld up the rear fender wells, remove the pop-rivets in the flares and glue them back on. There's also a huge hole I carved in the firewall for the harness, shortly after I cut this hole I decided to tuck the harness behind the engine instead, so I'll have to patch that up too. Here's some pics.
Rear fender well

Front fender flare, showing pop-rivets

The HUGE hole I cut in the firewall :(

-
Hey, i have both stock front seats. both have some tears but better than a lot i've seen. $150 let me know if your interested and i will take a pic
Get some pics, I'd love to see them. For $150 I'd like to get seats that are in great shape, ready to bolt in. If they're torn up I'll have to spend another $150 or so to get them recovered -so I'd need you to work with me on the price a bit.
I know your going for the stock look. Thats the only reason I have kept mine. I love my 510 but to be honest I find the stock seats a real pain in the ass.
Wanna trade for some super comfy MR2 seats :) LOL.
-
I may be asking to much for mine. $250 im in san diego
Those are some sharp looking seats! I was hoping for something a little cheaper, and a little closer to home. I'll let you know if I'm having a hard time finding anything.
i have a pair of seats, they arent stock but its worth a shot. I took them outta my 510

I was asking $100 but you can have them for $50
$50 sounds nice! I'm really trying to go for that stock look though...
-
I need front and back seats for my 510 project, I don't care if they're all original or if they've been reupholstered, as long as they look kinda like stock ones I'll be happy.
I currently have mr2 seats, which are really comfy, but I'm going for an all stock look.
I'm willing to trade my mr2 seats, or just buy your seats outright. Big plus if you're in the seattle area so I can come pick them up.
let me know!
ben
-
Day 2
little to no progress...
I haven't really done anything today, but I did pick up a few parts for it. I've had the hardest time tracking down headliner bows, but I finally found some. Unfortunately they're for a wagon, and I have a two door. I'm not sure how well they will fit, anybody have any ideas?
I realized after I posted last time that I had posted a 'before' picture of my car before I started disassembling it. I thought it would be cool to post a 'before before' picture of my car from when I first got it to give some better perspective.
So here's my car when I first started:

and here's one of my favorite pictures of my car from a couple years ago:

On the surface it looks like a great car, but under if you look close enough you'll start to notice that there are a few things worth fixing. Over the next few weeks and months I'll be tackling these issues and I think it'll be clear why I felt it was worth going back to bare metal to make it right.
ben
-
Hey thanks for the parts man! Let me know about the radio, b and c pillar covers and other stuff too! I'll get you pictures of that rear seat
-
I need the seat brackets, sent you a PM
-
Here's my car a 1970 2-door, I got it about 5 years ago as a rolling shell.
Since then I've swapped in an sr20det, and a whole bucketload of other mods.


There are a lot of quirky things with this car, some from the previous owner and some from me. This was the first real car project I ever worked on, and in the process I learned a lot. One of the biggest things I've come to realize is that patience is key. A bunch of things on my car that really bug me are a result of my inexperience and lack of patience.
My goal for this project is to revisit all the things I compromised on, this time being more patient and taking the time to do things right. I'll be taking the car all the way back down to bare sheet metal and then build it back up. Hopefully I can illustrate some of my mistakes and what I've learned in the process. I still have tons to learn, so bear with me!
Anyways, on to the project:
Day 1
I didn't do too much today, but I got a start. I began by removing the hood, and the valance over the wiper arms. The I pulled out the radiator, the intercooler and the headlights. The radiator is a generic summit racing aluminum radiator, and the intercooler is a generic ebay ones. When I originally chose these parts I was limited by my budget and what would physically fit under the hood/behind the grill. Both parts have worked well for my application, and I'll likely keep both these parts and use them again. However, the radiator inlets/outlets are about an inch bigger than those on the car. I was making it work by using a reducer, but it was kinda hokey and was beginning to crack. I'll likely be modifying these to make them match the size on the engine. The plumbing for the intercooler was equally cluster f*cked and will need revisiting too.
Here are some pics of the progress
Before:
After:


-
I need the headliner bows and the rails for the front seats, do you have those?
ben
-
I need a full set of belts for my 510,
front driver and pass, and two for the rear seats too, do you have these? (i'm dumb and not sure what they look like)
-
A few updates on the Dime....
-got the turbo in a few days ago and was able to make the IC pipes and everything clears the AC and PS lines.
-The IC has had the ends sealed and new inlets and outlets welded in.
-Went to advance auto and found some crazy shaped rad. hoses and found two that fits. Radiator install will be finished when I make a top mount for it.
-made a shroud for the shifter so it can be sealed up with boot. (have yet to find a boot)
-fabbed a bracket to actuate the park lock while using a parking brake from a KIA I got from the JY.
-finished the brake lines and did a quick bleed on the calipers. The dime has brakes!!
Tomorrow I will start the exhaust and waste gate install. Should be fun!!!!!
BF
What hoses did you use for your radiator, do you have part #'s? I hunted forever trying to find hoses, and I ended up having to cut and piece a few together to get something to fit.
project is looking great!!
ben
-
Your car made it onto AutoBlog, I'm really interested to see if it sells with the new publicity...
http://www.autoblog.com/2009/09/23/ebay-find-of-the-day-vq35de-powered-datsun-510-may-be-the-perfe/
-
that is a kickass car fisch! I saw it on cl too, and thought about it but I didn't have the balls to get it! Here's to you, that's going to be a great project.
-
A little update in case anyone is interested. I took my car to the Long Beach Rod Run last weekend and the diff worked great, I put over 500 miles and dozens of clutch dumping burnouts on it and it's holding together like a champ!
Who says r160's are weak? I don't think I could break it if I threw it off a bridge! (jk, knock on wood)
-
PM'd! I WANT!!!! :)
-
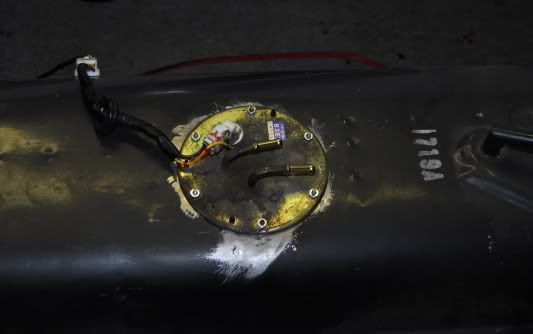
Today I finished modifying my gas tank for an in tank pump:
-
The rear control arm bushings are a PITA! I've done it before and I feel your pain. You have to get the sleeves out of there to get the new bushings in and its not easy.
I ended up using a saw to cut a slit in the sleeve lengthwise and that loosened it up enough to get it out with a press. give that a try, but be very careful, you don't want to cut into the control arm!
-
Looking for a tank from a fuel injected car to help me on my in-tank pump project for my 510. Doesn't matter how crappy and nasty the tank is, as long as the pump hanger is intact and its got 5/16" nipples (bigger nipples need not apply :rolleyes:) the cheaper the better, hopefully around the seattle area.
Thanks!
-
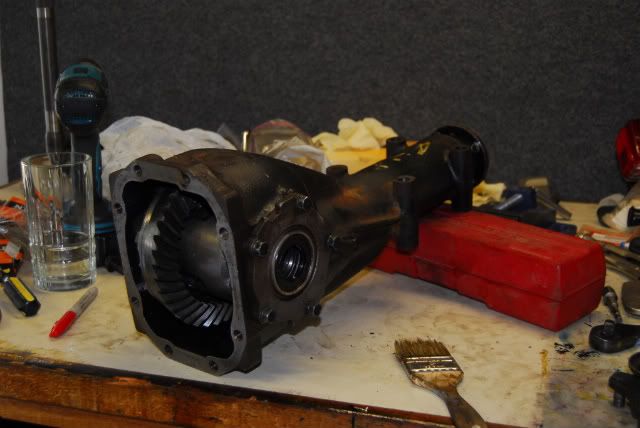
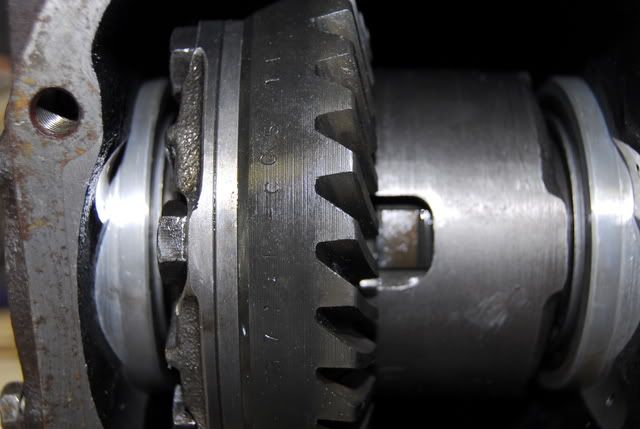
The 4.11 ring and pinion is in! Changing out a ring and pinion ain't easy, I kinda figured out how to do it as I went along. It's not installed in the car yet, and I haven't driven on it, but I double and triple checked every measurement so it should be good to go (fingers crossed).
-
Hey good to know you like the carpet :) If worse comes to worse with the seats and you really want it, I can get the seat and ship it to you if that helps...of course you pay shipping, just throwing that out there to help a fellow dimer out.
Thanks, I had the seller send me a pic of the seat and it was pretty nasty, probably not worth shipping...
BUMP!
Still looking for interior. Jovial_Cynic, if I can find a matching drivers seat I'll buy your passenger side. Anyone have a headliner they'll part with?
-
PM's you, i'm not sure what to offer, but I'm interested.
need some steering help
in General Technical
Posted
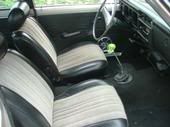
I'm having a little trouble figuring out how to line up my rack and pinion for my sr swap. I've mocked up the motor mounts, I think I have the engine sitting as far back as possible. Still I only have a few inches to fit the rack in, which makes the tie rods go at a funny angle (see funny angle below). Is this going to be a problem?
The steering knuckles are the early style (small tie rod stud) and are about 5.5" from the ball joint stud to the outer tie rod end. I heard a rumor that there are shorter steering knuckles out there; where can I get em?